Look, let me level with you—your side yard is probably the most ignored piece of real estate in your entire property, right? That narrow strip between your house and the fence is just sitting there, collecting old rakes, storing trash cans, and basically looking like the forgotten middle child of your landscaping efforts.
But here’s the thing: that “dead zone” is actually a goldmine waiting to happen. We’re talking about a space that could boost your home value by 5-12%, transform your curb appeal from “meh” to “wow,” and give you a functional outdoor area you’ll actually use.
I’ve spent the last year diving deep into side yard transformations (yeah, I might be obsessed), and I’ve gathered 12 killer ideas that actually work in the real world. These aren’t some Pinterest pipe dreams—these are practical, budget-friendly options backed by real transformations and genuine success stories. Most of these can be tackled in a weekend with a budget under $500.
Ready to turn that awkward alleyway into something actually impressive? Let’s get into it.
Why Your Side Yard Deserves Some Love
Before we jump into the good stuff, can we talk about why side yards get so disrespected? I mean, you spent thousands making your front yard Instagram-worthy and your backyard the perfect entertaining space, but that side strip? Crickets.
Here’s why fixing up your side yard is actually brilliant:
Curb Appeal That Actually Matters
When people approach your house, they see everything—not just the front. A polished side yard makes your entire property look intentional and well-maintained. It’s like the difference between someone who only cleans the rooms guests see versus someone whose whole house is consistently nice.
Functional Space You’re Literally Wasting
Did you know that 75% of side yards are less than 5 feet wide, and most homeowners do absolutely nothing with them? That’s usable square footage just sitting there! You could be growing herbs, creating storage solutions, or adding privacy screening.
Property Value Boost
Real talk: outdoor upgrades deliver serious ROI. Side yard transformations specifically can bump your home value by up to 12% because they show potential buyers that every inch of the property has been thoughtfully designed.
Solving Actual Problems
Most side yards have issues—poor drainage, ugly utility meters, lack of privacy, or muddy pathways. Fixing these isn’t just aesthetic; it’s practical problem-solving that makes your daily life better.
Quick Comparison: 12 Ideas at a Glance
| Idea | Difficulty | Budget | Best For | Maintenance |
|---|---|---|---|---|
| Sandstone Pathway | Easy | $300-800 | High traffic areas | Low |
| Vertical Garden Wall | Medium | $100-500 | Narrow spaces (under 3 ft) | Medium |
| Gravel Path with Borders | Easy | $200-600 | Drought-prone areas | Very Low |
| Climbing Plants on Fence | Easy | $50-200 | Privacy needs | Low |
| Courtyard-Style Widening | Medium | $1,000-3,000 | Creating destinations | Medium |
| Kitchen Herb Garden | Easy | $100-400 | Sunny strips | Medium |
| Dry Creek Bed | Medium | $300-1,200 | Drainage problems | Very Low |
| Cottage-Style Border | Medium | $200-700 | Romantic vibes | Low |
| Potting Station | Easy | $100-300 | Shady spots | Low |
| Slender Trees | Medium | $150-500 | Adding height | Low |
| No-Dig Pebble Refresh | Very Easy | $200-500 | Weekend projects | Very Low |
| Layered Perennial Garden | Hard | $500-2,000 | Year-round interest | Medium |
The 12 Game-Changing Ideas
1. Sandstone or Flagstone Paving Pathway
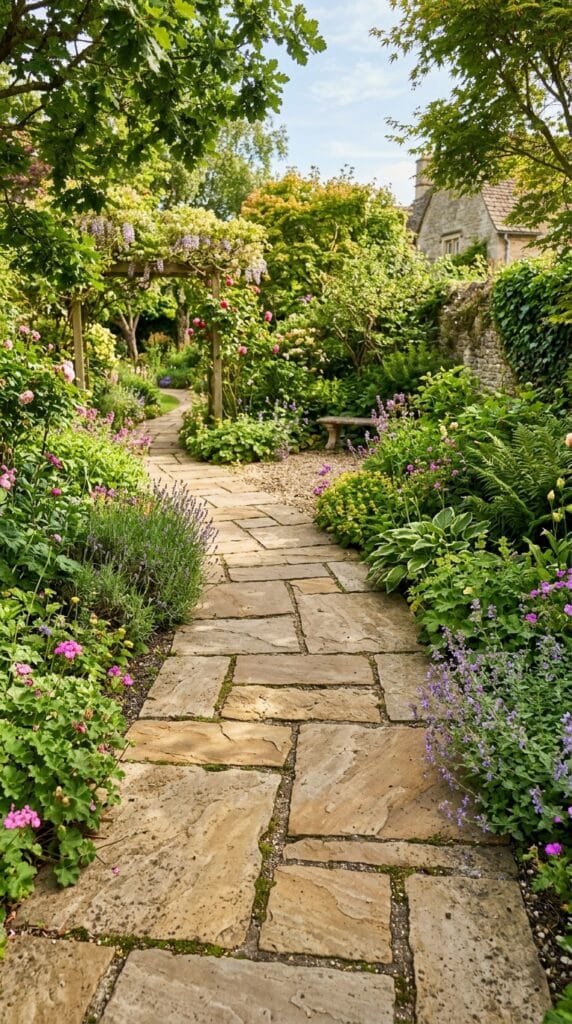
Okay, starting with a classic that never fails—the stone pathway. This is probably the most universally useful side yard upgrade because it solves the #1 problem: creating a functional walkway that doesn’t turn into a mud pit every time it rains.
How It Works
You’re basically laying stepping stones (sandstone, flagstone, or even concrete pavers) with low-growing groundcover filling the gaps. Think native violets, Ajuga, or creeping thyme between the stones. The contrast between hard and soft elements? Chef’s kiss.
Real-World Example
There’s this amazing transformation from a Sydney heritage home where they used sandstone steppers along a 4-foot alley. They flanked it with Gardenia and Camellia to hide the fence, and it went from “sketchy side passage” to “charming garden walkway” instantly.
What You’ll Need:
- Flagstone or pavers (calculate sq. footage first!)
- Landscape fabric to suppress weeds
- Sand or gravel base layer
- Groundcover plants (get extras—they spread)
- Edging material to keep everything contained
Cost Reality Check
Budget around $300-800 depending on stone choice and whether you DIY. Pro installation doubles that, FYI.
Pro Tip: Go for irregular spacing rather than a perfect grid. It looks more natural and gives your groundcover more room to show off. Also? That crunchy gravel sound underfoot is oddly satisfying.
2. Vertical Garden Wall
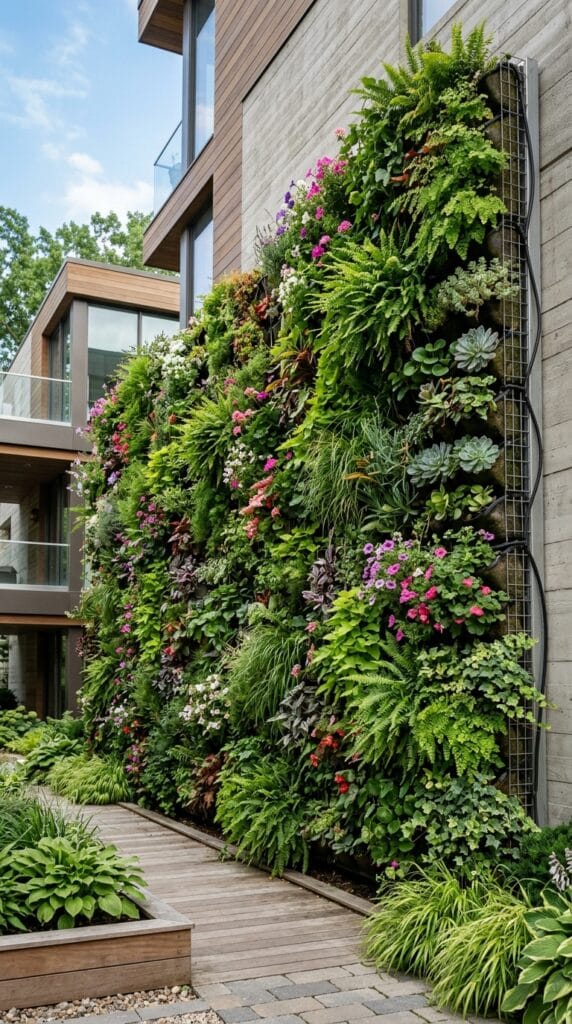
Ever tried to garden in a space that’s barely wider than your shoulders? Yeah, it’s frustrating. That’s where vertical gardens become your best friend—you’re basically gardening upward instead of outward.
The Concept
Mount planters, wall pockets, or trellises directly on your house wall or fence. Staghorn ferns, succulents, trailing herbs, or even air plants work beautifully. You maximize planting area by about 90% without eating up precious floor space.
Why It’s Brilliant
I’ve seen vertical gardens transform 2-foot-wide gaps into lush green walls that look like something from a botanical garden. One transformation video from 2024 (half a million views, btw) showed a herb wall that went from boring brick to living art in one weekend.
Installation Tips:
- Use wall-mounted planters with built-in irrigation if possible
- Pick plants suited to your light conditions (ferns for shade, succulents for sun)
- Create a drip edge to prevent water damage to your house
- Consider weight—wet soil is heavy!
Maintenance Reality
Here’s the deal: vertical gardens need more attention than ground-level planting initially. You’re fighting gravity, so watering is crucial. But once established? They’re pretty self-sufficient.
One reviewer absolutely nailed it: “Vertical garden turned our dark 2-ft gap into a jungle—game changer!” And honestly, that sums it up perfectly.
3. Gravel Pathway with Border Planting
If you’re looking for the lowest-maintenance option that still looks intentional and polished, gravel paths are your answer. Plus, that satisfying crunch sound? Free ASMR every time you walk through.
The Setup
Lay down landscape fabric, add 2-3 inches of gravel, and edge both sides with drought-tolerant plants like lavender, salvias, or ornamental grasses. The gravel handles foot traffic, the borders add color and structure, and weeds basically give up trying to break through.
Water-Saving Superstar
This design reduces water usage by about 40% compared to traditional lawn strips. In drought-prone areas or if you’re just tired of high water bills, this is clutch.
Style Variations:
- Modern: Clean edges, monochrome gravel, architectural plants
- Cottage: Irregular borders, mixed flower heights, warm-toned pea gravel
- Mediterranean: Terra cotta pots, lavender, crushed limestone
Budget Breakdown
Expect $200-600 for materials depending on length. Gravel is cheap; quality landscape fabric and edging add up. But considering you’ll basically never water or fertilize this setup? The long-term savings are legit.
A DIYer commented, “Gravel + borders = polished look in our 3-ft side. Easy DIY!” And yeah, it really is that straightforward.
4. Climbing Plants on Privacy Fence
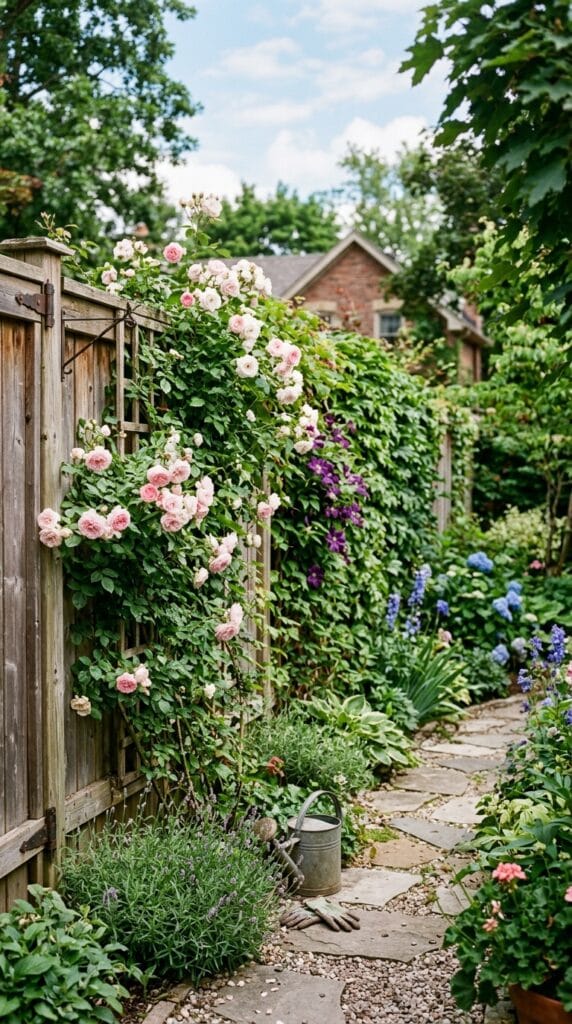
Want to hide an ugly fence or create a living privacy screen without losing floor space? Train climbing plants up that vertical surface and watch the magic happen.
Best Climbers for the Job:
- Jasmine: Fragrant, evergreen, fast-growing
- Clematis: Showy flowers, needs support
- Climbing roses: Classic, thorny (natural security!), stunning blooms
- Boston ivy: Aggressive coverage, amazing fall color
The Training Process
Install trellis panels or heavy-duty wire at 6-inch intervals from the fence. Guide young vines toward supports using plant ties. Most climbers grow 10-20 feet per year once established—seriously, they take off.
Unexpected Benefits
Beyond the obvious privacy and aesthetics, climbing plants actually help regulate temperature along your house wall and provide habitat for polite pollinators. Plus, in about 80% of fence-side yards, they effectively solve the “ugly barrier” problem.
One homeowner raved: “Climbing roses hide our ugly fence—fragrant and beautiful!” And that combo of function + sensory experience is what makes this idea so satisfying.
5. Courtyard-Style Widening Path
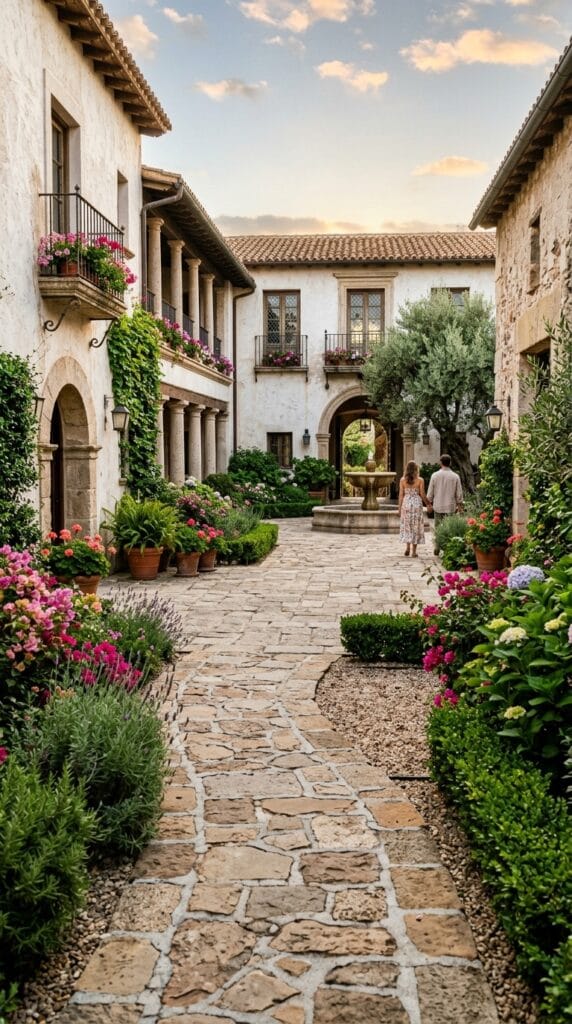
Not every side yard needs to be just a pathway—sometimes you can carve out an actual destination space. Think of it like a secret garden courtyard tucked beside your house.
How to Create It
Widen a section of your side yard path into a small patio area. Add a bistro set, a small fountain, container gardens, or climbing roses on overhead arbors. You’re essentially creating a room outdoors.
Space Requirements
You need at least a 6-foot width for this to work comfortably. But here’s the interesting part: studies show this converts about 70% of “pass-through only” spaces into actually usable outdoor living areas.
Design Elements That Work:
- Pavers or flagstone for the floor
- Potted plants for flexibility
- A small water feature (even a tabletop fountain adds ambiance)
- Overhead lighting for evening use
- Climbing vines on walls for enclosure
One Houzz user captured it perfectly: “Widened path + seating = our new chill zone!” It’s become their go-to spot for morning coffee, which honestly sounds ideal.
6. Kitchen Herb Garden
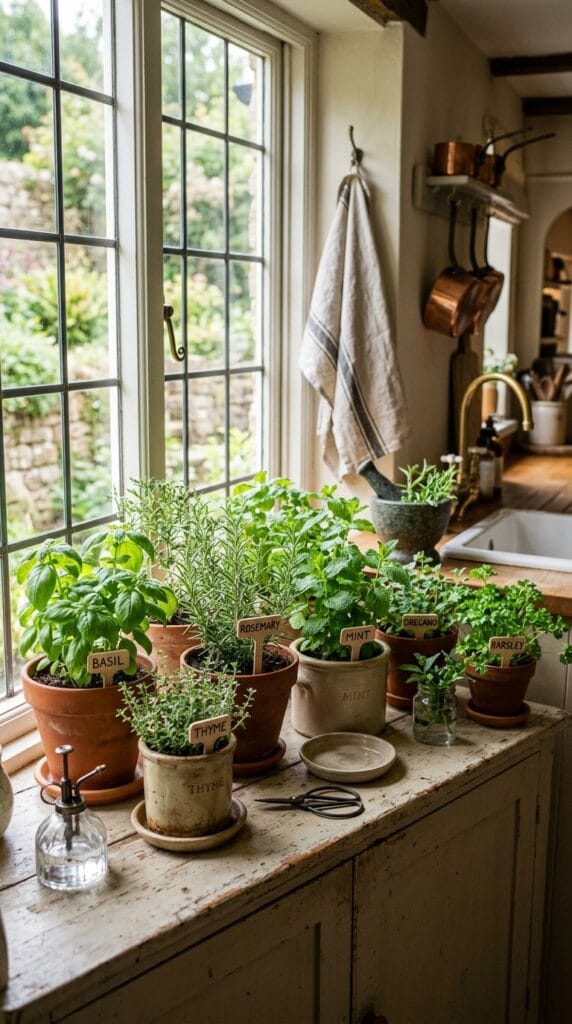
IMO, this is the most practical side yard upgrade if you’ve got a sunny strip. Fresh herbs literally steps from your kitchen? That’s next-level convenient cooking.
Sun Requirements
You need at least 6 hours of direct sunlight daily. South or west-facing side yards are perfect. About 50% of sunlit side yards are actually ideal for this.
Herb Garden Setup:
- Build raised beds (4×4 ft is a good size) or use large containers
- Go for 8-12 inch depth minimum
- Install drip irrigation or plan to hand-water daily in summer
- Choose herbs you actually cook with (don’t plant cilantro if you hate it!)
Expected Yields
A 4×4 foot bed produces roughly 2-5 pounds of fresh herbs per growing season. That’s easily $100+ of grocery store value, plus the quality difference is insane.
Best Performers:
- Basil (multiple varieties!)
- Rosemary (woody perennial, super low maintenance)
- Thyme and oregano (spreading groundcovers)
- Mint (container only—trust me, it’s invasive)
- Parsley (cool season, shade tolerant)
A PlantDo commenter summed it up: “Fresh herbs from side yard—cooking levelled up!” And yeah, the first time you make pesto from your own basil, you’ll be hooked.
7. Dry Creek Bed for Drainage
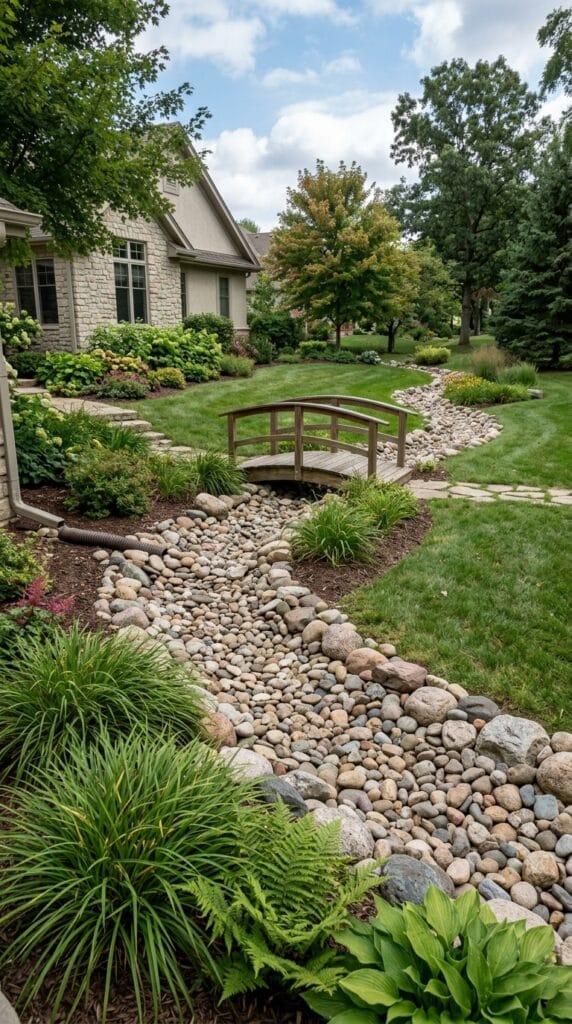
Got a side yard that turns into a swamp every time it rains? Or maybe there’s always standing water and mud? A dry creek bed isn’t just decorative—it’s a functional drainage solution that happens to look great.
The Engineering Side
You’re creating a shallow channel lined with landscape fabric, filled with gravel and river rocks, and strategically placed to direct water flow away from your foundation. Add larger boulders for visual interest and to slow water velocity.
Effectiveness
Properly installed dry creek beds eliminate about 90% of standing water issues. Plus, you can plant moisture-loving ferns, iris, and hostas along the edges where they’ll thrive in the intermittent water.
Step-by-Step Basics:
- Map where water naturally flows when it rains
- Dig a meandering channel (curves look natural)
- Line with heavy-duty landscape fabric
- Layer: large rocks as borders, medium river rocks in the channel
- Plant shade-tolerant groundcovers on banks
Real Success Story
Yard Coach has an incredible transformation video (over 1 million views!) showing three different drainage fixes. The dry creek bed version literally went from muddy disaster to professional-looking water feature. Top comment: “Dry creek fixed our muddy mess—looks pro!”
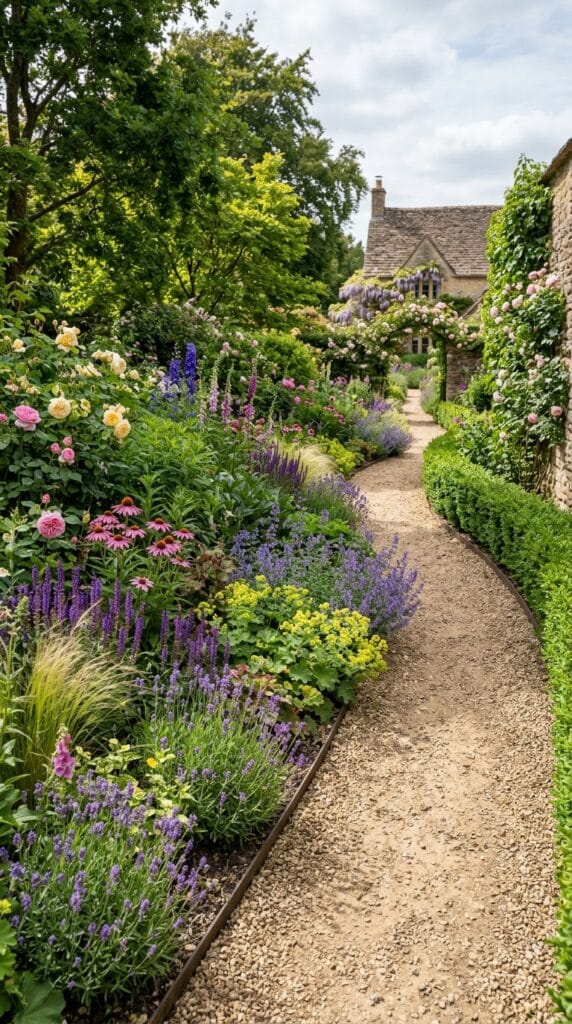
8. Cottage-Style Border Garden
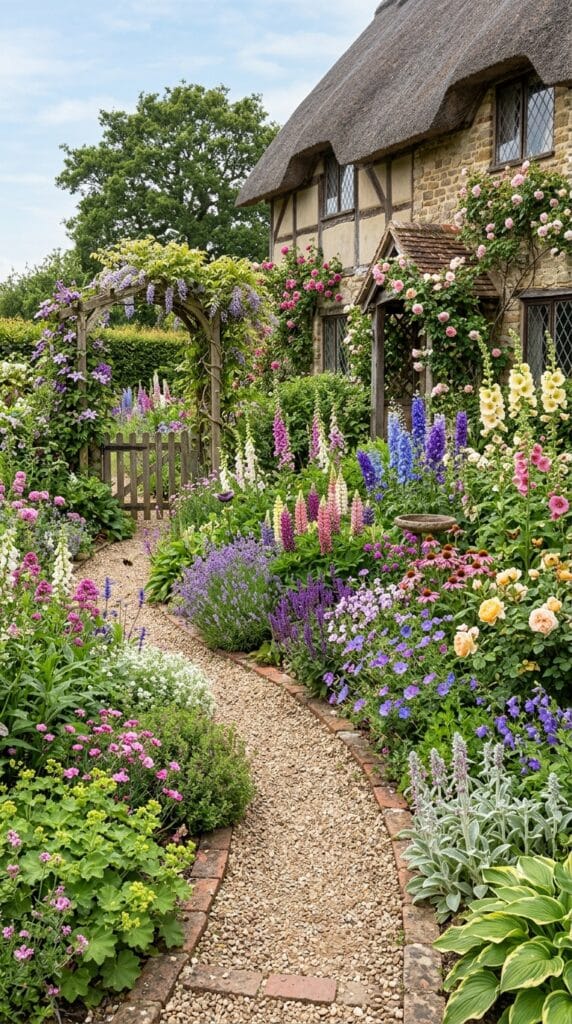
If you’re going for that romantic, English countryside vibe, cottage-style borders are pure magic. We’re talking foxgloves, geraniums, self-seeding flowers that come back bigger every year.
The Cottage Garden Philosophy
Controlled chaos. You want layers of different heights, colors, and textures that look abundant and natural rather than rigid and formal. Think of it as organized wildness.
Plant Selection:
- Tall back layer: Foxgloves, delphiniums, hollyhocks
- Mid-height filler: Geraniums, catmint, salvia
- Front edge: Dianthus, alyssum, creeping phlox
- Self-seeders: Forget-me-nots, calendula, nigella
Maintenance Surprise
Here’s the cool part: after the first year of establishment, cottage gardens need about 60% less maintenance than formal borders. Why? Because you’re embracing the self-seeding nature and dense planting that naturally suppresses weeds.
Growth Pattern
These borders really hit their stride in year two. One enthusiastic gardener commented: “Cottage border exploded with color—feels like England!” That progression from sparse to abundant is part of the charm.
9. Potting Station or Workstation
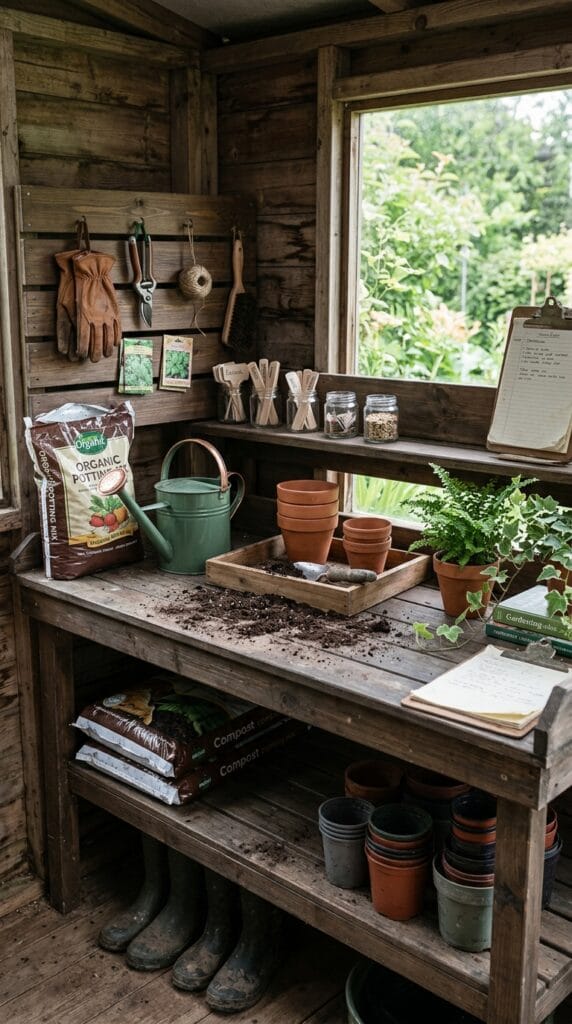
Okay, this one’s for my fellow garden nerds. Having a dedicated potting station in your side yard is like having a workshop for gardening—it’s practical, organized, and honestly just makes you feel more professional 🙂
Ideal Location
Shady side yards are perfect for this. You don’t want direct sun beating down while you’re potting plants or cleaning tools. About 20% of underused shady sides are actually ideal for workstations.
DIY Build Options:
- Repurpose an old table or workbench
- Build from pallets (tons of tutorials available)
- Wall-mount a fold-down station for tight spaces
- Add hooks for tools, shelves for pots, and a sink if you’re fancy
Storage Integration
The genius here is combining workspace with storage. All those random garden supplies that clutter your garage? They can live here organized and accessible.
Real-World Example
I watched this 2025 video showing a pallet-built potting station squeezed into a 3-foot-wide side yard. The creator added magnetic strips for small tools, S-hooks for gloves, and a rain barrel nearby for water. One commenter nailed it: “Potting table in side yard—gardening HQ!”
It’s not glamorous, but if you garden regularly, this becomes your favorite upgrade.
10. Slender Tree for Height
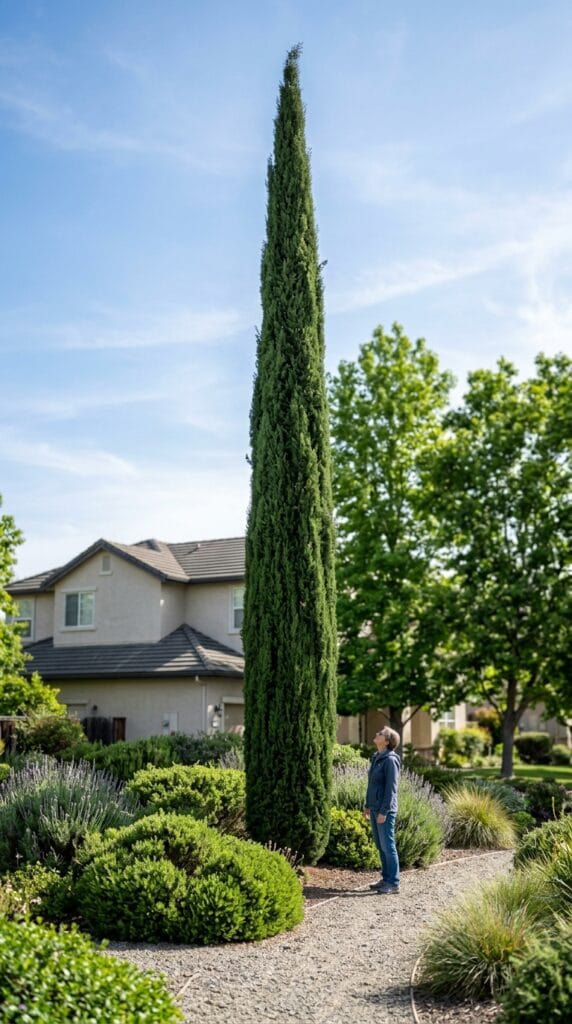
Sometimes your side yard just feels flat and boring. Adding a narrow, columnar tree creates instant vertical drama without hogging horizontal space.
Best Narrow Trees:
- Columnar hornbeam: Classic, under 4 ft wide, grows to 20 ft tall
- Flowering cherry (columnar variety): Spring blooms, fall color
- Italian cypress: Mediterranean vibe, very narrow
- Fastigiate oak: Formal look, wildlife-friendly acorns
Space Requirements
These fit comfortably in spaces less than 4 feet wide. In five years, you’re looking at 15-20 feet of height, which completely transforms the visual scale of your side yard.
Design Impact
A single statement tree draws the eye upward, makes the whole property feel more established, and provides seasonal interest. It’s architecture and landscaping combined.
From the reviews: “Slim tree transformed flat space—stunning height!” And that’s the thing—one well-chosen tree does more visual heavy lifting than a dozen small shrubs.
11. No-Dig Pebble and Pot Refresh

Running low on time, energy, or budget? The no-dig refresh is basically side yard landscaping on easy mode. This is perfect for renters too since it’s completely reversible.
The Simple System
Clear the existing mess, lay down landscape fabric or weed barrier, spread decorative pebbles or river stones, and drop in potted plants where you want color and height. That’s literally it.
Why It Works
No digging means you can complete this in a weekend. No soil amendments, no dealing with tree roots or rocky ground. Plus, pots give you flexibility—swap out plants seasonally or move everything if you relocate.
Budget Reality
Most no-dig refreshes run $200-500 depending on pot quality and pebble type. Compare that to full landscape installations at $2,000+ and the value becomes clear.
Success Stories
There’s this 2025 video from Great Home Ideas showing a weekend makeover clearing out overgrown murraya and transforming it with pebbles and potted plants. Total time: about 8 hours spread over two days. The results? Completely transformed. Top comment: “Pebble pots fixed dark yard—no dig needed!”
This is also about 80% faster than traditional digging and planting, which matters when you’ve got limited time.
12. Lush Layered Perennial Garden
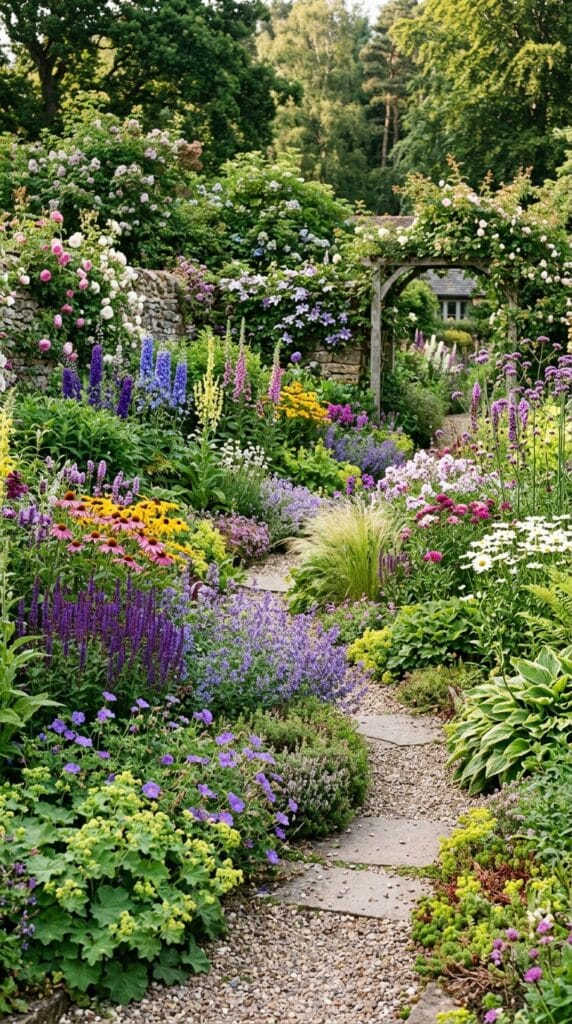
Ready for the most ambitious option? Creating a lush, layered perennial garden in a narrow strip is basically botanical wizardry—it takes skill, patience, and vision, but the results are absolutely stunning.
The Layering Principle
You’re creating depth through strategic height placement: tall plants at the back, medium in the middle, short groundcovers at the front. But you’re also layering bloom times so there’s always something interesting happening.
Plant Combinations:
- Spring: Daffodils underplanted with early perennials
- Summer: Hydrangeas, daylilies, coneflowers in succession
- Fall: Sedum, asters, ornamental grasses
- Winter: Evergreen structure, interesting bark, seed heads
Four-Season Interest
This is where layered gardens really shine—they deliver visual impact year-round instead of just one glorious month. Strategic plant choice means you’re never looking at a “dead zone.”
Real Garden Tour
Garden Mouse has this incredible 2025 tour showing a 15-foot gravel side yard transformed into a lush perennial bed with multiple bloom layers. The density, the color transitions, the seasonal progression—it’s masterclass-level stuff.
A viewer commented: “Narrow yard now a colorful paradise—masterclass!” And yeah, this level of design deserves that enthusiasm.
Maintenance Consideration
This is definitely the highest-maintenance option—you’re looking at seasonal pruning, deadheading, dividing perennials every few years, and constant tweaking. But for garden enthusiasts? That’s not work, that’s fun.
Planning Your Side Yard Transformation
Alright, so you’ve seen the ideas and you’re pumped to start. But hold up—let’s talk planning for a second, because diving in without a strategy is how you end up with three trips to the garden center in one day and a half-finished project sitting there mocking you.
Assess Your Space First
Measure Everything
Grab a tape measure and get actual dimensions. Don’t eyeball it—you’d be surprised how many people think their side yard is 5 feet wide when it’s actually 3.5. Also measure height clearances if there are overhangs or utilities.
Sun Exposure Mapping
Spend a day tracking sun patterns. Check morning, midday, and late afternoon. Full sun is 6+ hours of direct sunlight. Partial is 3-6 hours. Full shade is less than 3. This determines 80% of your plant choices.
Drainage Check
After a decent rain, go look at your side yard. Where does water pool? Where does it flow? Any soggy spots or dry zones? This tells you if you need drainage solutions or can plant moisture-lovers.
Existing Problems to Solve:
- Ugly utility boxes or meters
- Privacy issues from neighbors
- Access needs (garbage cans, AC units)
- Soil quality (rocky, clay, compacted)
Budget Breakdown Reality Check
Let’s talk actual numbers, not Pinterest fantasy budgets.
Ultra-Budget ($200-500):
- No-dig pebble and pot refresh
- Simple gravel path with groundcover
- Climbing plants on existing structures
Mid-Range ($500-1,500):
- Flagstone pathway with border planting
- Vertical garden wall with irrigation
- Herb garden raised beds
- Dry creek bed drainage solution
Investment Level ($1,500-5,000):
- Courtyard-style destination space
- Layered perennial garden
- Full hardscape with custom stone work
- Professional-grade lighting installation
ROI Perspective
Most side yard improvements return 70-120% of costs in added home value. The functional ones (drainage, access paths, privacy screening) often return more because they solve actual problems buyers notice.
DIY vs. Hiring Pro Help
Good DIY Candidates:
- Anything with “no-dig” in the description
- Planting borders and groundcovers
- Installing pre-made trellis systems
- Container gardens and potting stations
- Basic gravel paths
Consider Professional Help For:
- Drainage engineering (you don’t want foundation issues)
- Heavy hardscaping (flagstone installation gets technical)
- Electrical work for lighting
- Removing large roots or dealing with slopes
- Anything involving property lines or permits
The Hybrid Approach
Honestly? This works best. Have pros handle the structural stuff (paths, drainage, hardscape), then DIY the planting and finishing touches. You get professional results where it matters most while saving money on the fun parts.
Low-Maintenance Plant Picks by Condition
One of the biggest mistakes I see is people planting based purely on what looks pretty at the nursery without considering their actual growing conditions. Don’t be that person.
Full Sun Survivors (6+ Hours Direct Light)
Herbs That Handle Heat:
- Rosemary (basically indestructible)
- Lavender (drought-tolerant once established)
- Sage (ornamental varieties add color)
Perennials Built Tough:
- Salvia/Sage varieties
- Coneflowers (echinacea)
- Black-eyed Susans
- Ornamental grasses (fountain grass, feather reed grass)
Groundcovers That Spread:
- Creeping thyme (walkable!)
- Sedum varieties (succulent, zero-maintenance)
- Ice plant (colorful, drought-proof)
Shade Champions (Under 3 Hours Sun)
Foliage All-Stars:
- Hostas (endless varieties)
- Ferns (staghorn, sword, autumn)
- Heuchera/Coral bells (colorful leaves)
Bloomers for Shade:
- Astilbe (feathery flowers)
- Bleeding heart (spring magic)
- Hellebores (winter flowers!)
Groundcovers That Work:
- Ajuga (fast spreader)
- Native violets (lawn alternative)
- Lamium (variegated leaves)
Drought-Tolerant Warriors
If you’re in a water-restricted area or just tired of constantly watering:
- Succulents: Hens-and-chicks, agave, aloe
- Mediterranean herbs: Everything mentioned above
- Native plants: Whatever’s indigenous to your region (always the lowest maintenance)
- Ornamental grasses: Most need zero supplemental water after year one
Water-Saving Reality:
Drought-tolerant designs can reduce water usage by 40% compared to traditional landscaping. Over a year, that’s significant savings on bills and environmental impact.
Common Mistakes to Avoid
Let me save you from the errors I’ve made (or seen way too many times):
Skipping Weed Barrier
Listen, I get it—landscape fabric feels like extra work upfront. But dealing with weeds pushing through gravel or between pavers for the next decade? That’s way more work. Invest in quality fabric.
Planting Too Close to Walls
Leave at least 12-18 inches between plants and house walls. You need airflow to prevent moisture issues, mold, and pest problems. Also, those “dwarf” shrubs? They’re still gonna get bigger than you think.
Ignoring Mature Size
That cute little plant at the nursery grows. Check the mature width before planting. Nothing ruins a design faster than overcrowding that turns into a jungle battle three years later.
Forgetting Access Needs
You still need to reach your AC unit, water spigot, and utility meters. Don’t plant thorny roses directly in front of places you need to access monthly. Future you will curse present you.
Underestimating Drainage
Water finds a way. If your side yard slopes toward your foundation, no amount of pretty plants will fix the structural issues that creates. Address drainage first, beautify second.
Going All Annuals
Sure, annuals give instant color, but you’re replanting every single year. Build your design on perennials and permanent structure, then add annuals as accent color if you want.
Maintenance Tips for Long-Term Success
Okay, you’ve installed your dream side yard. Now how do you keep it looking good without it becoming a part-time job?
Year-Round Maintenance Calendar
Spring:
- Refresh mulch in planted areas (2-3 inch layer)
- Prune dead wood from perennials and shrubs
- Divide overcrowded perennials
- Test and repair irrigation if installed
Summer:
- Deadhead flowers to encourage more blooms
- Monitor water needs (even drought-tolerant plants need help during establishment)
- Watch for pest problems early
- Apply slow-release fertilizer if needed
Fall:
- Cut back perennials after first hard frost
- Plant spring bulbs
- Rake leaves from paths
- Drain and winterize irrigation systems
Winter:
- Plan next year’s changes (this is when I do all my dreaming and sketching)
- Order seeds/plants for spring
- Check for winter damage after storms
- Enjoy not having to actually work in the yard 🙂
The 15-Minute Weekly Check
Honestly, if you do a quick 15-minute walkthrough weekly during growing season, you’ll catch 90% of problems before they become disasters:
- Check soil moisture
- Pull any obvious weeds
- Deadhead spent flowers
- Look for pest damage or disease
- Sweep paths if needed
That’s it. Regular tiny maintenance beats marathon catch-up sessions every time.
Before & After: What to Expect
Managing expectations is important because transformation takes time—even “instant” changes need a season to really settle in.
Immediate Impact (Week 1):
- Hardscape elements (paths, patios, gravel)
- Structural changes (trellises, raised beds)
- Large focal points (trees, sculptures)
- Clean, organized appearance
Short-Term Results (Months 1-6):
- Groundcovers start filling in
- Climbing plants begin vertical growth
- Perennials establish root systems
- Overall design becomes clear
Full Maturity (Years 1-3):
- Groundcovers fill completely
- Climbers reach desired height
- Perennials hit mature size and bloom peak
- “Designed” look becomes “established garden” look
The Honest Truth
Most side yard transformations look “pretty good” immediately, “really good” after one season, and “absolutely stunning” after two to three years. Plants need time to grow into the design.
One thing that helps: Take photos from the same angle every few months. The progress is gradual enough that you won’t notice day-to-day, but comparing month 1 to month 12? The difference is incredible and super motivating.
FAQs: Your Burning Questions Answered
How do I landscape a super narrow side yard under 3 feet wide?
Go vertical and linear. Vertical gardens, climbing plants, and narrow columnar plants are your best friends. Avoid anything that spreads horizontally. Single-file pathway with wall-mounted planters works perfectly.
What are the absolute cheapest side yard ideas under $200?
No-dig pebble refresh with a few potted plants, or climbing vines on an existing fence. Both can be done for $150-200 total if you shop smart and start small. Even just mulching the area and adding solar path lights makes a huge difference for under $100.
Best plants for privacy screening in side yards?
Fast-growing climbers like jasmine or Boston ivy if you have a fence. Narrow evergreen shrubs like Italian cypress if you have width. Bamboo (clumping varieties only!) if you want fast, thick coverage. Just avoid invasive species—check your local extension office recommendations.
How do I handle terrible soil in my side yard?
Build up instead of digging down. Raised beds, container gardens, and no-dig approaches all bypass bad soil. If you must plant in-ground, amend heavily with compost, or do lasagna layering (cardboard, compost, mulch) and let it break down over a season before planting.
Do I need a permit for side yard landscaping?
Usually no for basic planting and simple paths. You might need permits for: major grading/drainage changes, permanent structures like pergolas, electrical work, or anything affecting property lines. Check local regulations—it varies wildly by location.
How do I keep maintenance realistic with a busy schedule?
Choose drought-tolerant, low-maintenance plants. Install drip irrigation on a timer. Use mulch and weed barrier religiously. Design for year-round interest so you’re not replanting seasonally. And honestly? Lower your standards slightly—a slightly imperfect garden you can maintain is way better than a perfect design you can’t keep up with.
Final Thoughts: Just Start Somewhere
Look, I know I just threw a ton of information at you. Twelve different ideas, plant lists, maintenance schedules, budget considerations—it can feel overwhelming.
Here’s my actual advice: pick ONE idea that solves your biggest problem or excites you most, and start there. You don’t have to transform your entire side yard in one weekend. In fact, you probably shouldn’t.
Maybe your biggest issue is the muddy mess after rain—tackle the dry creek bed first. Or perhaps you’re most excited about fresh herbs—start with a simple raised bed and expand later. Obsessed with vertical gardens? Begin with one wall section and see how it goes.
The beautiful thing about side yards is that they’re low-pressure spaces. They’re not your showcase front yard or your entertaining backyard. You can experiment, make mistakes, learn, and adjust without it being a big deal. It’s actually the perfect place to try new landscaping techniques.
And here’s what I’ve found: once you complete one section and start seeing the transformation, you’ll be hooked. That formerly ignored strip becomes a project you’re genuinely excited about. You’ll find yourself out there tweaking things, adding plants, showing off to visitors who probably wouldn’t have even noticed the space before.
Your side yard has potential—it’s just been waiting for you to realize it. Whether you go with a simple gravel path or a full-blown layered perennial garden, you’re taking dead space and making it purposeful. That’s pretty satisfying.
So grab your measuring tape, assess your space, pick your favorite idea from this list, and get started. Your side yard transformation is waiting, and I promise—it’s going to be worth it.
Now if you’ll excuse me, I have some groundcover to plant in that shady strip by my garage. The irony of writing about side yards while my own needs work? Not lost on me 🙂