Look, I get it. You walk into your craft room, and instead of feeling inspired, you’re greeted by fabric chaos that looks like a textile explosion. Piles everywhere, fat quarters falling off shelves, and that one piece of fabric you know you bought but can never find. If your small craft room feels more like a fabric avalanche waiting to happen than a creative sanctuary, you’re not alone. Most crafters I know (myself included) struggle with keeping their stash organized when space is basically nonexistent.
Here’s the thing: organizing a fabric stash in a tiny craft room doesn’t require expensive custom cabinets or a Pinterest-perfect makeover. Nope. What you need are smart, stackable, and honestly doable solutions that won’t break the bank. I’m talking foam board, Target bins, and some creative thinking that’ll transform your space from “creative chaos” (fancy term for disaster zone) to an actual functional workspace.
So let’s cut through the fluff and get into 10 genuinely clever storage ideas that real sewers are using right now in 2025. These aren’t theoretical – these are tested, proven methods that’ll help you maximize every inch of your craft room without losing your mind.
Why Smart Storage Actually Matters (And It’s Not Just About Being Tidy)
Before we jump into the solutions, can we talk about why this matters beyond just looking nice on Instagram? When your fabric stash is organized, you spend less time hunting for materials and more time actually creating. You’ll stop buying duplicate fabrics because you forgot you already had that perfect floral print. And honestly? Walking into an organized craft space just feels good – it’s motivating instead of overwhelming.
Small craft rooms present unique challenges. You can’t just stack everything horizontally because you’ll run out of floor space in about five seconds. That’s where vertical storage, stackability, and smart categorization become your best friends. These strategies help you preserve your fabric properly (no dust, no stretching, no wrinkling) while keeping everything visible and accessible.
Plus, let’s be real – when your stash is organized, you actually use what you have instead of letting it collect dust. That’s the whole point, right? 🙂
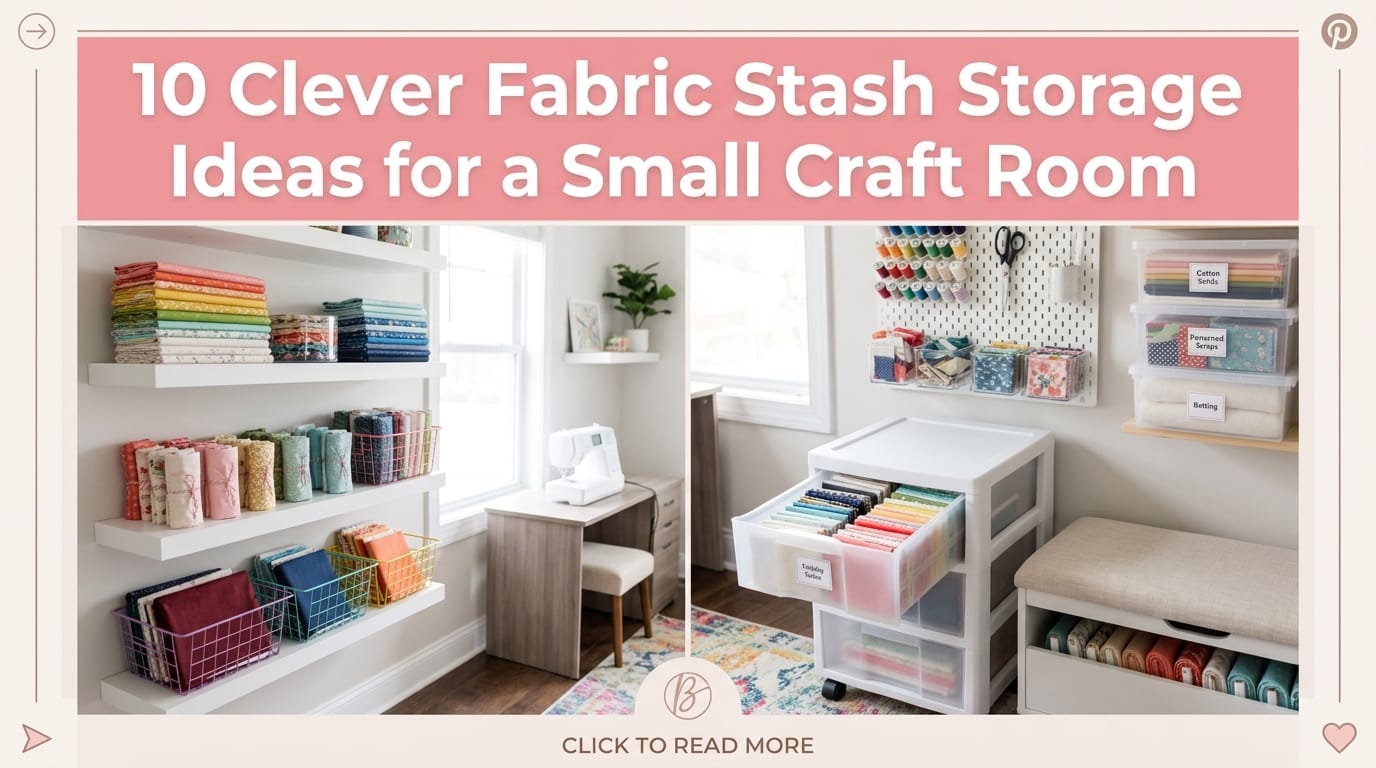
Foam Board Mini Bolts for Yardage (Your New Best Friend)
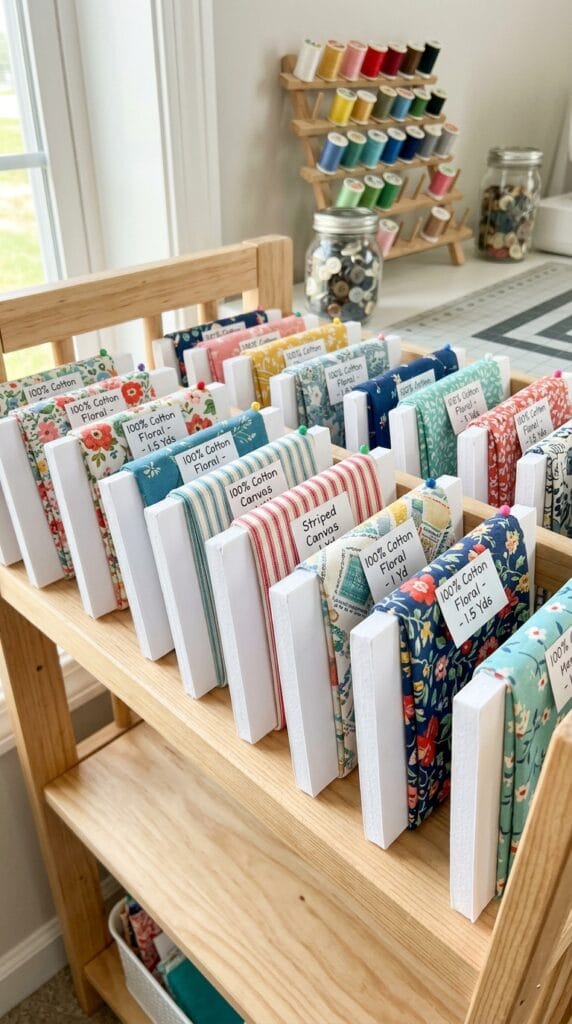
This storage hack changed my life, and I’m not being dramatic. Foam board mini bolts are perfect for storing 0.5 to 3 yards of fabric, and here’s why: they’re sturdy, stackable, and ridiculously affordable.
How to Make Them
Grab a 20×30-inch foam board (you can find these at any craft store) and cut it into 7.5×10-inch pieces. Each board gives you eight mini bolts – that’s some serious bang for your buck. Here’s the process:
- Fold your fabric in thirds to about 9 inches wide
- Wrap it around your foam board piece
- Pin it to secure (prevents that annoying unraveling situation)
- Stack them on shelves like tiny fabric soldiers
The beauty of foam board? It’s way sturdier than those flimsy comic book boards that everyone used to recommend. Those things bend and sag, which is just… frustrating. Foam board holds up under pressure and doesn’t warp over time.
Pro tip: Label the edge of each board with fabric type, yardage, or color family. Trust me, future you will be grateful when you’re searching for that specific teal cotton at midnight before a project deadline.
Target Stackable Trays for Precuts (Because Who Doesn’t Love Target?)
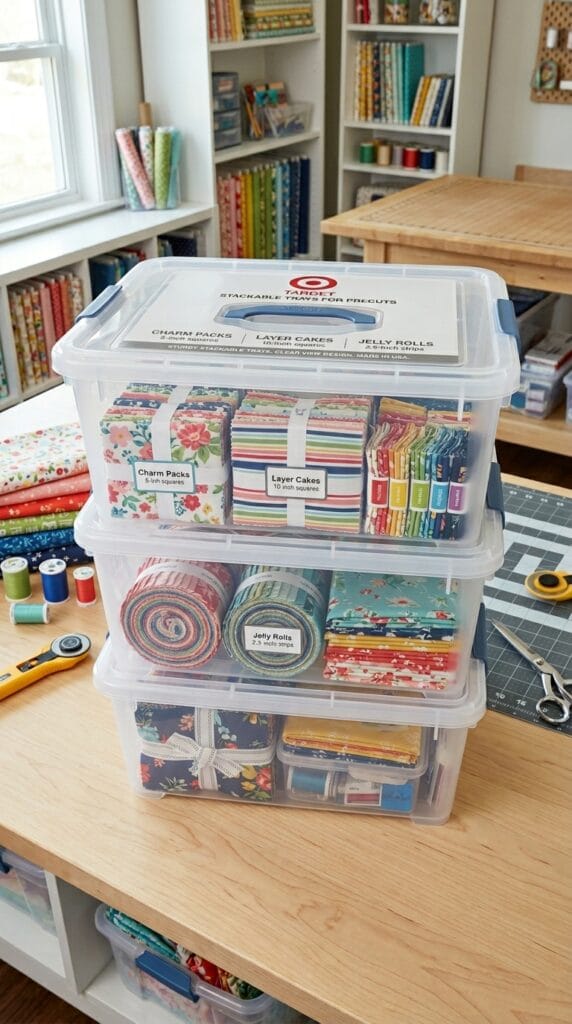
Fat quarters, charm packs, and those adorable precut bundles you keep collecting (no judgment) need their own home. Target’s Bright Room 12×12-inch stackable trays are slightly oversized, which makes them absolutely perfect for this job.
Why do I love these? You can stack four or more trays high, and they utilize shelf depth like champions. The slightly larger size means you’re not cramming fat quarters in there – they sit comfortably and you can actually see what you have.
Best Practices for Tray Organization
- Group by color family – makes coordinating projects way easier
- Keep collections together – if you bought a matching bundle, don’t separate them
- Stack strategically – put your most-used fabrics in the top trays
The trays are clear-ish, so you get some visibility without pulling everything down. And honestly, they just look clean and organized, which makes your whole craft room feel more put-together.
Clear Sliding Drawer Bins for Collection-Based Precuts (The Accessibility Winner)
Okay, this one’s a game-changer if you’re tired of unstacking everything just to reach the bottom layer. Target has these clear bins with independent drawers – each drawer slides out separately, so you don’t have to dismantle your entire storage system to grab one jelly roll.
These work brilliantly for organizing by collection. Got a bunch of precuts from the same designer or fabric line? Keep them together in one bin. The visibility factor is huge here – you can see what’s in each drawer without opening it, which saves time and prevents the “I forgot I had this” syndrome.
Stack these babies up and suddenly you’ve got a mini fabric library that’s both functional and satisfying to use. IMO, they’re worth every penny if you have lots of precut collections.
Narrow Foam Board for Jelly Rolls (Tiny But Mighty)
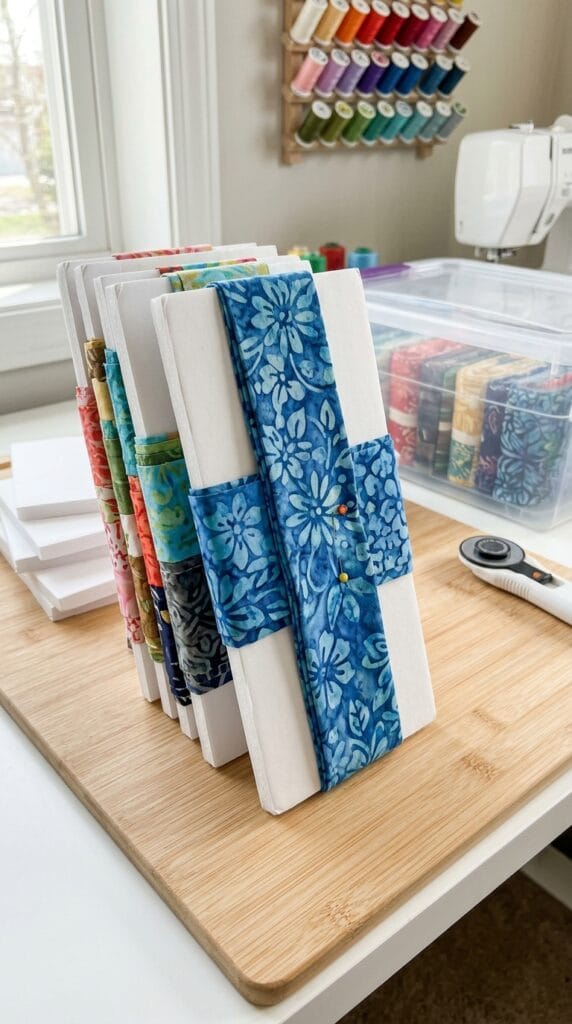
Jelly rolls are weird to store because they’re so narrow and tend to unravel at the worst possible moments. The solution? Cut foam board to 2.5 inches wide specifically for mini jelly roll bolts.
Pin the strips to the board to prevent them from unraveling, and then stack these narrow boards on shelves. They take up minimal space and keep your strips organized and ready to use. After testing different widths, 2.5 inches seems to be the sweet spot – wide enough to be stable but narrow enough to maximize shelf space.
This is one of those “why didn’t I think of this sooner” solutions. Simple, cheap, effective. The trifecta of craft room organization.
Stackable Clear Bins for Project-Specific Scraps (Because Scraps Multiply Like Rabbits)
Let’s address the elephant in the room: fabric scraps. They accumulate faster than you can say “quilting project,” and before you know it, they’re taking over your entire workspace.
Here’s the strategy: sort scraps by project or color into stackable clear bins. Keep pieces smaller than 0.5 yards neatly folded (I know, folding scraps feels weird, but it works). The clear bins let you see what’s inside without digging through everything.
Why This Works
You’re utilizing vertical shelf space while keeping those slightly wrinkled messes contained. Multiple crafters swear by this method because the visibility factor prevents you from buying fabric you already have in scrap form. Plus, when you’re starting a new project, you can grab the color-specific bin and see what’s available instantly.
Stack them high, label them clearly, and suddenly your scraps become a resource instead of a problem. Revolutionary? Maybe not. Effective? Absolutely.
Acrylic Shelf Dividers for Larger Yardage (The Neat Freak’s Dream)
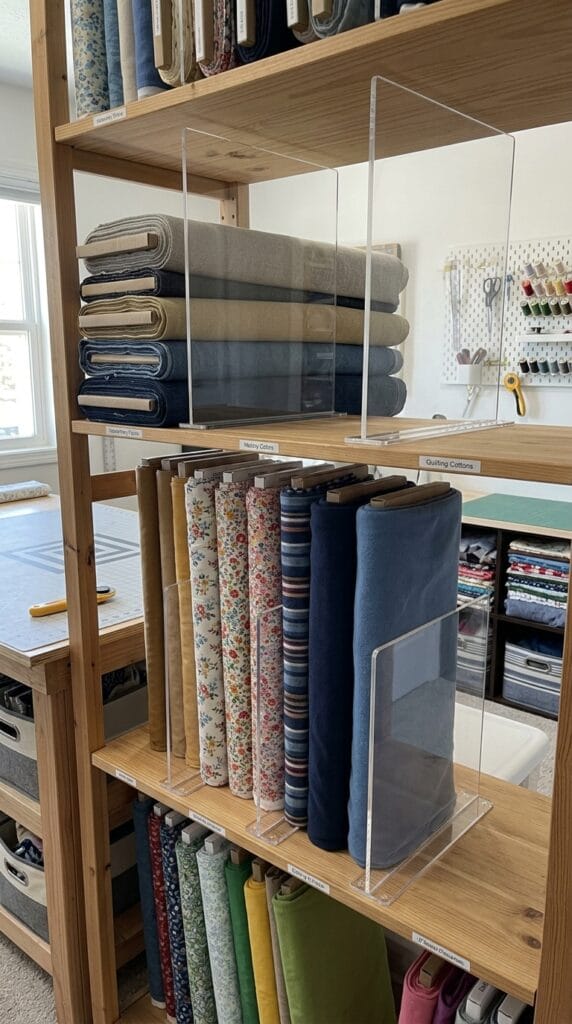
If you’ve got yardage that you want to store upright (which honestly looks amazing and is super functional), acrylic shelf dividers are your answer. Install these removable dividers on your shelves to create separate sections for different fabric types or color families.
The adjustable nature means you can customize widths based on your stash size. This prevents that annoying domino effect where one piece falls and suddenly your entire shelf is a fabric avalanche. The dividers keep everything standing neat and tidy, and you can see exactly what you have at a glance.
Bonus: This method was featured in a 2025 craft room makeover, and it looks legitimately like a fabric store. If that’s not craft room goals, I don’t know what is.
IKEA Billy Bookcase or Drawer Units (The Budget-Friendly Workhorse)
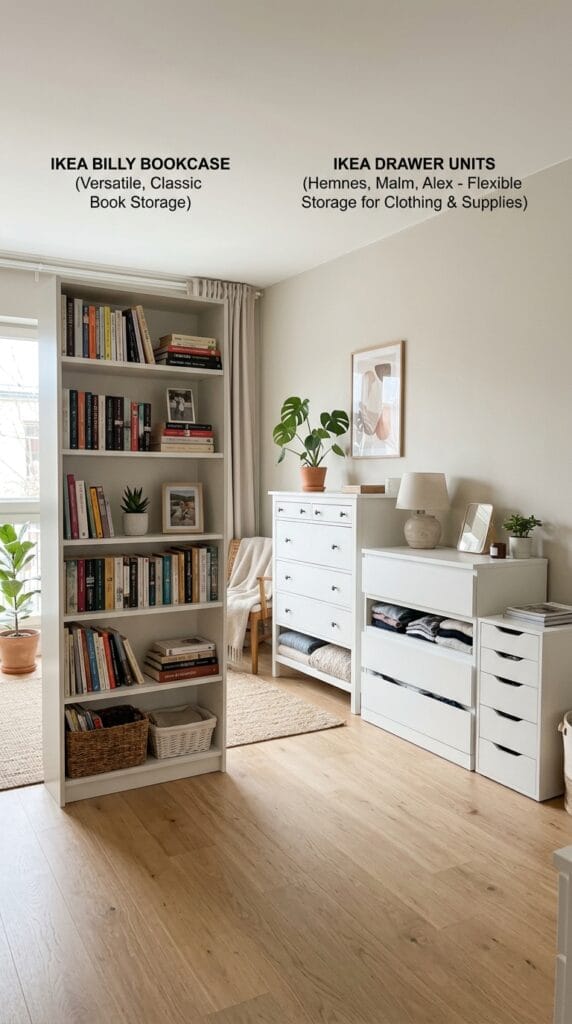
IKEA’s Billy bookcase is basically the unofficial mascot of craft room organization, and for good reason. These bad boys hold upright yardage beautifully, and the matching drawer sets are perfect for storing fat quarters and half yards.
Here’s something interesting: the drawer units actually hold more fabric than 12 scrapbook boxes when you fold pieces in thirds. That’s significant space savings right there. The drawers balance cost, capacity, and visibility – though I’ll be honest, accessing back-row fabrics in drawers can be slightly annoying. But the superior capacity makes up for it.
Setting Up Your Billy System
- Upper shelves: Store yardage upright with dividers
- Lower drawers: Organize precuts and smaller pieces
- Side shelves: Perfect for bins with scraps or notions
This system is scalable, affordable, and blends into basically any decor style. What’s not to love?
Soft-Sided Cubes or DIY Bags for Flexible Storage (The Temporary Solution That Works)
Sometimes you need storage that adapts to your current needs. Soft-sided cubes turned sideways give you visibility for yardage, and here’s a cool hack: sew box corners into shopping bags to create foldable temporary bins.
This is excellent for small rooms where you need collapsible options post-project. When you’re done with a project, fold up the bag and reclaim that space. When you’re actively working, unfold it and have your materials accessible.
These solutions are perfect for renters or people who frequently rearrange their craft space. The flexibility factor is unbeatable, and the cost is minimal (or free if you repurpose bags you already have).
Woven Baskets Sorted by Pattern Type (The Long-Term Strategy)
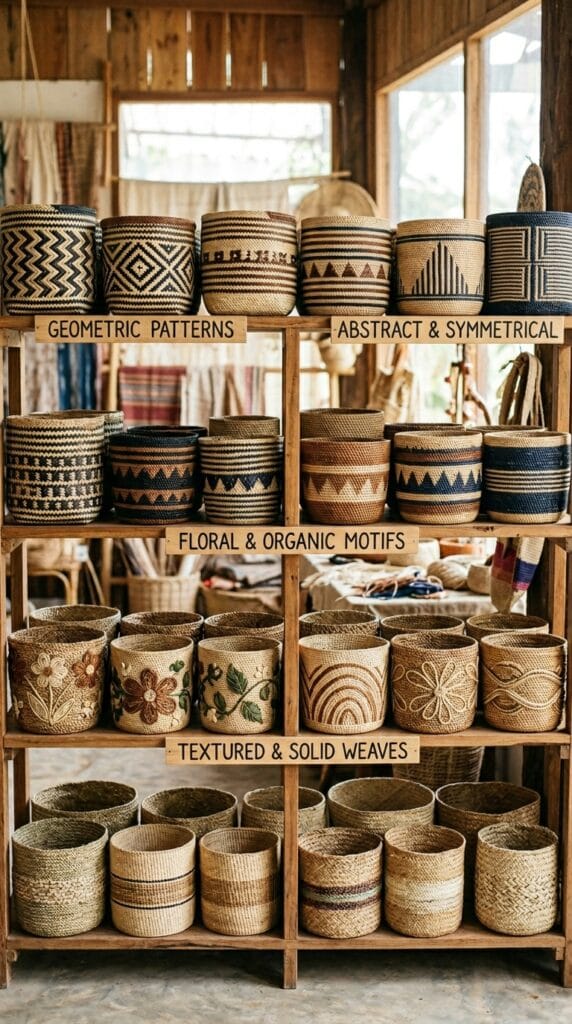
This method is old-school but gold-school. Categorize your fabric into stackable woven baskets by pattern type – solids together, checks together, patterns together, etc. Fold fabric loosely inside (no need to be super precise here) for quick access.
One crafter I know has used this method for years in her home sewing room, and she swears it’s scalable for small studios too. The baskets look nice, they’re easy to label, and they work on basically any shelf system you already have.
The beauty of this approach? It’s intuitive. When you need a solid for a border, you know exactly which basket to grab. No sorting through mixed piles or digging through bins. Just straight to the source.
Compartment Boxes for Scraps and Small Pieces (The Detail-Oriented Approach)
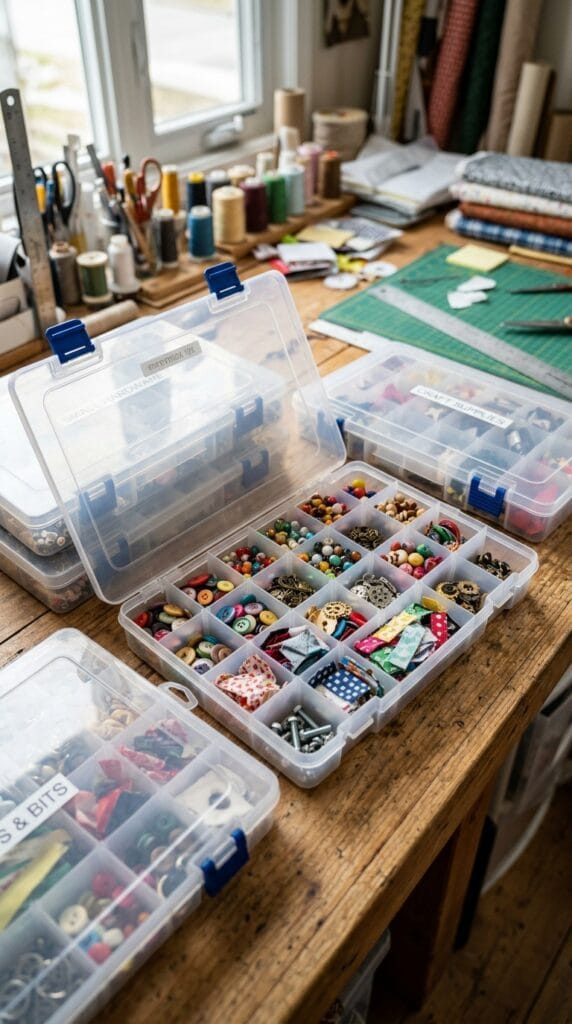
For those really small pieces – Liberty fat quarters, specific half yards, or project-specific bits – compartment boxes are phenomenal. You can find these at stores like Aldi or B&M, or grab larger plastic bins with dividers.
The key here is separation by project. Instead of one giant container where everything gets lost, you have designated compartments. This enhances findability dramatically in cramped setups.
Think of it like drawer organizers but for fabric. Each compartment holds a specific type or project grouping, and you’re not rummaging through a massive container hoping to find that one piece. FYI, this method also works great for organizing coordinating fabrics for future projects – keep everything for one quilt in one compartment, and you’re ready to go when inspiration strikes.
Making It All Work: Implementation Tips That Actually Matter
Alright, so you’ve got these ten ideas, but how do you actually implement them without creating more chaos in the process? Here’s the deal:
Start With Categorization
Before you buy a single storage solution, sort your fabric. Group by:
- Size: Yardage, fat quarters, scraps, precuts
- Type: Cotton, flannel, specialty fabrics
- Project status: Allocated for specific projects vs. general stash
- Frequency of use: Stuff you reach for constantly vs. occasionally
This sorting process shows you exactly what storage solutions you actually need. Don’t just buy bins because they’re cute. Buy them because they solve a specific storage problem you’ve identified.
The 80% Rule
Never stuff storage containers to maximum capacity. Aim for 80% full. This leaves room for future additions and makes it easier to access what’s already there. Overstuffed bins become frustrating real quick – nothing’s more annoying than struggling to close a container because you crammed too much in there.
Label Everything (Seriously, Everything)
Your memory is not as good as you think it is. Label shelves, bins, drawers, foam boards – all of it. Use a label maker if you’re feeling fancy, or just grab some masking tape and a Sharpie. The point is clear identification.
Pro labeling tip: Include information like fabric type, yardage amount, or color family. Future you (especially future you at 11 PM starting a project) will thank present you profusely.
Rotate Seasonally
If you sew seasonal projects, rotate your storage accordingly. Move spring fabrics to easily accessible spots in late winter, rotate summer fabrics forward in spring, etc. This keeps your most relevant materials at your fingertips and prevents you from digging through winter flannel when you’re trying to make summer sundresses.
Common Pitfalls to Avoid
Let me save you some headaches by pointing out mistakes I’ve seen (and made):
- Buying storage before sorting – you’ll end up with the wrong sizes
- Ignoring vertical space – small rooms NEED vertical storage
- Using only one method – combine strategies for best results
- Forgetting about fabric care – make sure fabrics can breathe, especially natural fibers
- Making it too complicated – if your system is too fussy, you won’t maintain it
The goal is functional organization that you’ll actually use, not Instagram perfection that’s impossible to maintain. :/
Real Crafters, Real Results
These aren’t theoretical ideas I pulled from thin air. Real sewers and quilters are using these methods right now with excellent results.
One creator transformed her fabric piles into neat, accessible stash using foam board mini bolts, calling them “sturdy and stackable – very important qualities” for small spaces. She tested the method on everything from yardage to jelly rolls and found the pin-secured system prevented unraveling perfectly.
Another crafter went from “total creative chaos” (her words) to an organized back wall featuring acrylic dividers and clear bins. She noted that the visibility factor alone changed how she approached projects – she could actually see what she had and plan accordingly.
A studio tour from an English paper piecing enthusiast showed baskets sorted by pattern type that she’s maintained “for years” successfully. Her comment? The compartment boxes made it “much easier to find what I need” compared to dumping everything in huge bins.
And multiple creators in 2025 are highlighting mini bolts as game-changers – one described her organized stash as “my own little fabric shop” with tiny bolts for leftover jelly rolls being “something I absolutely love.”
The common thread (pun intended)? These methods work because they’re practical, adaptable, and actually sustainable to maintain long-term.
The Bottom Line: Your Craft Room, Your Rules
Here’s the truth: there’s no one-size-fits-all solution for fabric storage. Your perfect system depends on your space, your stash size, your sewing style, and your personal preferences. Some people thrive with everything visible on open shelves. Others prefer the clean look of closed drawers and bins.
The ideas I’ve shared here are starting points – mix and match based on what makes sense for your situation. Maybe you use foam board mini bolts for yardage, Target trays for fat quarters, and baskets for scraps. That’s a completely valid combination.
The goal isn’t perfection. The goal is creating a system that helps you enjoy your craft more and stress about organization less. If you can find your fabric when you need it, see what you have at a glance, and preserve your materials properly, you’re winning.
Start with one or two ideas that resonate with you. Implement them. See how they work. Adjust as needed. Your craft room is a living space that should evolve with your needs, not a museum display that must remain untouched.
Now grab some foam board, hit up Target for those bins, and get started. Your organized craft room is waiting, and honestly? It’s closer than you think. Happy organizing, friends! 🙂