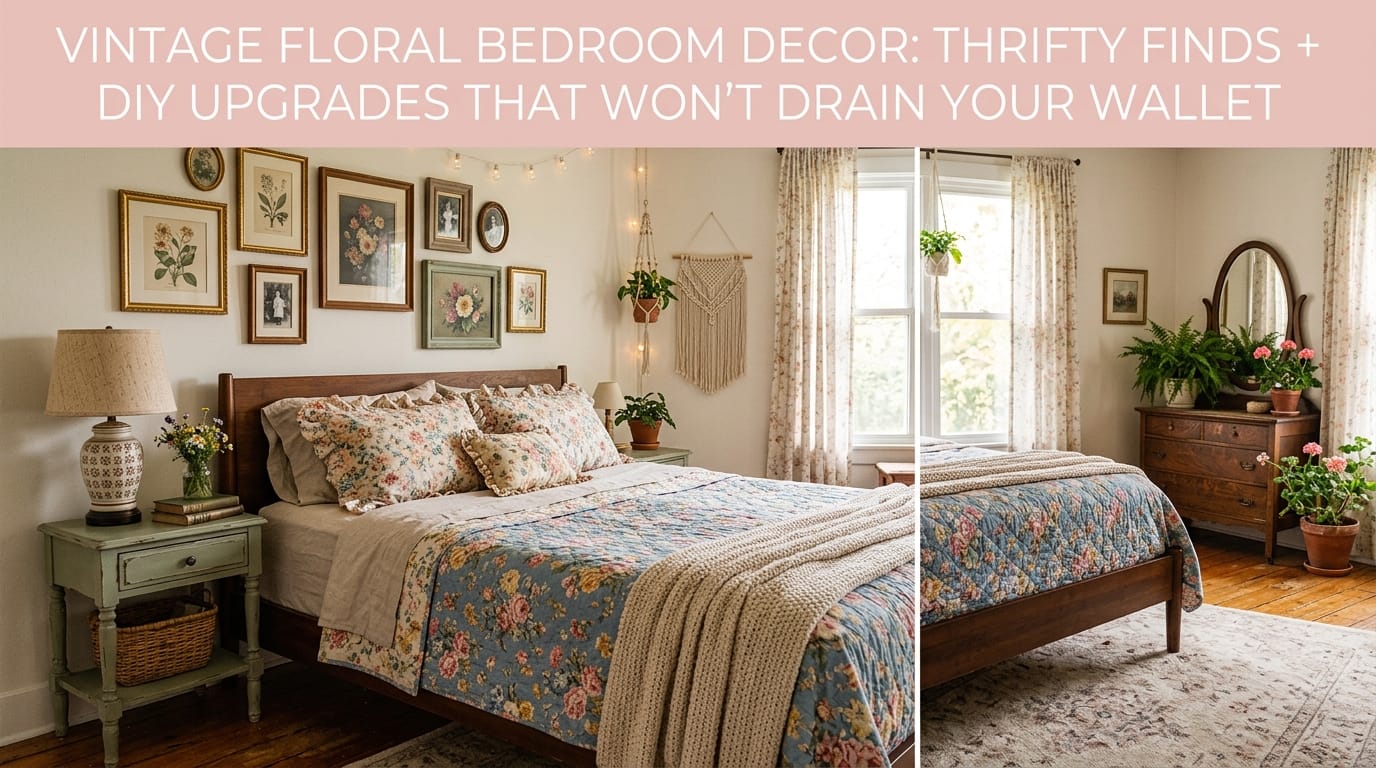
Look, if you’re scrolling through Pinterest at 11 PM dreaming about a cozy, vintage floral bedroom but wincing at the price tags on designer bedding, I’ve got great news—you don’t need to spend a fortune to create that “grandma’s cottage meets your personal sanctuary” vibe. The vintage floral bedroom trend exploding in 2026 is honestly perfect for budget-conscious decorators because the whole aesthetic thrives on authenticity, mismatched charm, and collected-over-time pieces that scream “lived-in storytelling.”
Here’s the real talk: you can transform a bland bedroom into a botanical dream for under $200 by mixing thrifted treasures with surprisingly simple DIY upgrades. Whether you’re renting, saving for bigger life goals, or just prefer your money staying in your bank account where it belongs, this guide walks you through exactly how to nail this trend without selling a kidney. Let’s get started 🙂
What Makes Vintage Floral Bedroom Decor the 2026 Sweet Spot?
Why This Trend Actually Sticks Around
Vintage floral design combines nostalgia with genuine comfort, which honestly feels like the antidote to our overstimulated, minimalist-obsessed culture. You’re not just decorating; you’re creating a retreat that makes you want to actually stay in bed (for good reasons, not depression reasons).
The grandmillennial movement—basically millennials rediscovering cottagecore aesthetics their grandmothers never left—drives about 40% of younger people adopting traditional floral styles. Why? Because there’s something profoundly calming about muted rose pinks, sage greens, and cream tones layered with botanical prints. These colors literally reduce visual clutter and trigger your nervous system to chill out.
FYI, floral and botanical motifs rank as the top vintage pattern across 2026 bedroom designs, per design platform data. Victorian florals and Arts & Crafts prints lead the charge for their calming, nature-inspired effects—plus they photograph amazingly for Instagram (not that we’re all doing that, but… we are).
The Color Palette That Actually Works
You’ll want to anchor your room in muted, soft tones rather than bold, jarring colors. Think dusty roses, cream, soft sage green, and pale blues. This trio works because:
- Rose + Cream: Victorian revival energy; feels romantic without being saccharine
- Sage Green + Botanical Greens: Mid-century influence; brings outdoor calm indoors
- Cream as Your Base: Acts as a visual rest stop; prevents your room from feeling chaotic
Sticking to a 3-color family (seriously, this is key) controls the visual chaos and makes your room feel intentional rather than “I bought everything at different thrift stores and hoped it matched.” Spoiler: it usually does, because vintage designers actually knew what they were doing.
Where to Score Thrifted Vintage Finds Without the Stress
The Best Places to Hunt (Beyond Just Thrift Stores)
Here’s where most people go wrong—they think “thrifting” means walking into Goodwill and hoping for the best. You need a strategy, my friend.
Sidewalk Rescues
Your neighbors throw away absolute treasures on bulk trash day. I’m talking vintage nightstands, bed frames, dressers with real brass hardware. Check your local community Facebook group the day before bulk collection and grab solid wood pieces that just need a little TLC.
Estate Sales
This is where you find the real vintage floral gold. Estate sales (especially in older neighborhoods) feature quilts, linens, and furniture pieces that genuinely belonged to someone’s grandmother. You’ll pay $20-40 for a legitimate vintage quilt that would cost $200+ new. The trick? Go early, bring cash, and don’t be shy about negotiating if you’re buying multiple items.
Thrift Stores (Strategic Timing)
Hit stores on Monday or Tuesday mornings when new inventory hits the floor. Look specifically for:
- Solid wood nightstands (ignore ugly finishes; paint fixes that)
- Metal bed frames (instant vintage charm)
- Quilts and blankets with any floral elements
- Wooden dresser bases for upcycling
- Picture frames for botanical print displays
Facebook Marketplace & Craigslist
People literally give away furniture here. Search “free” and sort by items listed in the last day. You’ll find random treasure mixed with actual junk, but the free options let you be picky without guilt.
| Thrifty Source | What to Look For | Price Range | Pro Tips |
|---|---|---|---|
| Sidewalk Rescues | Solid wood furniture, bed frames | Free | Go on bulk day; check FB groups |
| Estate Sales | Vintage quilts, linens, period furniture | $15-50 | Arrive early; bring cash; ask about multi-item discounts |
| Thrift Stores | Nightstands, dressers, frames, quilts | $5-40 | Shop Monday-Tuesday mornings; inspect wood quality |
| Facebook/Craigslist | Large furniture pieces, bulk lots | Free-$30 | Act quickly; check condition photos carefully |
| Local Antique Markets | Curated vintage textiles, prints | $10-60 | More expensive but vetted quality |
What Condition Should You Actually Buy?
Ever wondered why some thrifted pieces feel “charming vintage” and others just feel “broken”? Condition matters.
- Wood Furniture: Look for solid construction (not particle board). Surface damage? That’s character. Structural issues? Walk away.
- Quilts & Textiles: Small stains clean up. Large rips? Skip it unless you’re advanced with textile repair. Fading? That’s literally the whole vibe.
- Metal Bed Frames: Rust shows character; broken welds don’t. If it folds together sturdy, grab it.
- Fabric Upholstery: Avoid anything with mysterious odors or deep stains. These don’t disappear through willpower alone.
The golden rule: If you wouldn’t pay full price for it, don’t buy it thrifted “to fix later.” Future-you doesn’t have the energy.
Eco-Friendly Recycled Textiles: The Lazy Person’s Shortcut

Not feeling the thrift hunt? Recycled floral throws and bedding hit different when you’re low on spoons or energy.
Brands like Wandering Folk produce 100% recycled cotton throws with woven floral designs—think fringed edges, botanical prints, soft muted tones. You’ll pay $30-50, which isn’t free but delivers consistent quality and aligns with your whole “vintage aesthetic” vibe without the hunt.
These work beautifully as:
- Layered throws over thrifted quilts
- Instant softness for rental apartments
- Sustainable alternatives to fast-fashion bedding
- Multi-use pieces for different rooms (rotate seasonally)
The texture actually adds depth to your room setup, and knowing it’s recycled? That hits the sustainability sweet spot without requiring you to be morally superior about it 🙂
Free + Low-Cost Decor: The Overlooked Goldmine
Botanical Prints from Your Attic (Or Grandma’s)
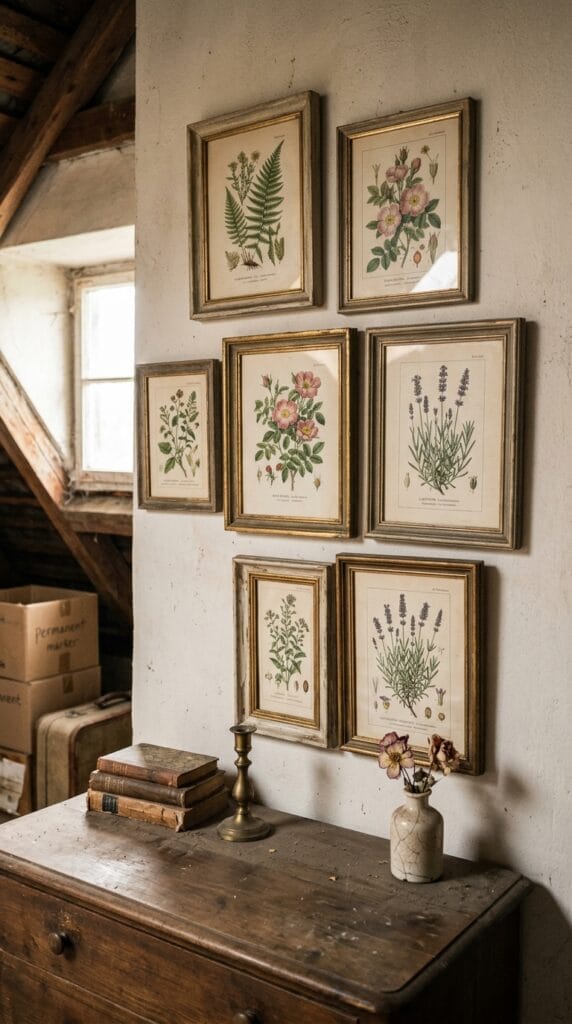
You know what costs absolutely nothing and looks intentional as heck? Faded botanical prints, old frames, and vintage illustrations from your attic or your relatives’ attics.
Create an “artwork wall” above your bed or dresser using:
- Black and white botanical sketches
- Faded botanical watercolors
- Old encyclopedia pages featuring flowers
- Vintage seed packet covers (scan these if originals are fragile)
Frame them in mismatched thrifted frames painted in soft whites, creams, or sage. Your room instantly looks like you collected these on purpose rather than “decorated in one day.”
Thrifted Frames as Your Secret Weapon
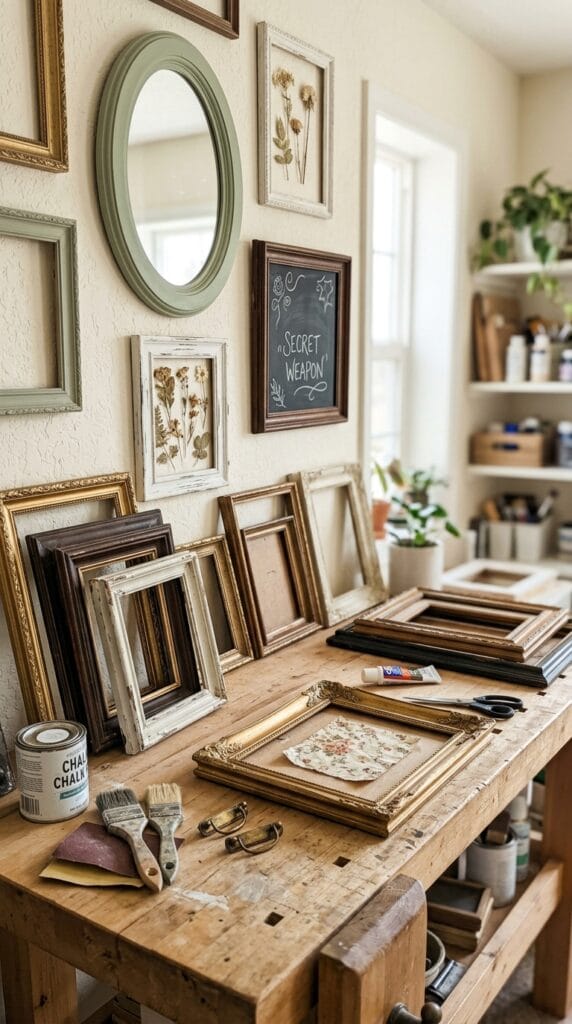
Hit thrift stores specifically for wooden frames in various sizes. Spray paint them (soft white, cream, or a dusty sage) and fill with:
- Pressed flowers you dried yourself
- Printable botanical illustrations (search “free vintage botanical prints” on Etsy; many creators offer free downloads)
- Pages from old floral-printed fabric
- Watercolor paintings you create (they don’t have to be good, honestly)
This approach costs under $20 total and looks custom-made.
DIY Upgrades: Easy Projects That Actually Make a Difference
Floral Wall Decals (The Renter’s Dream)
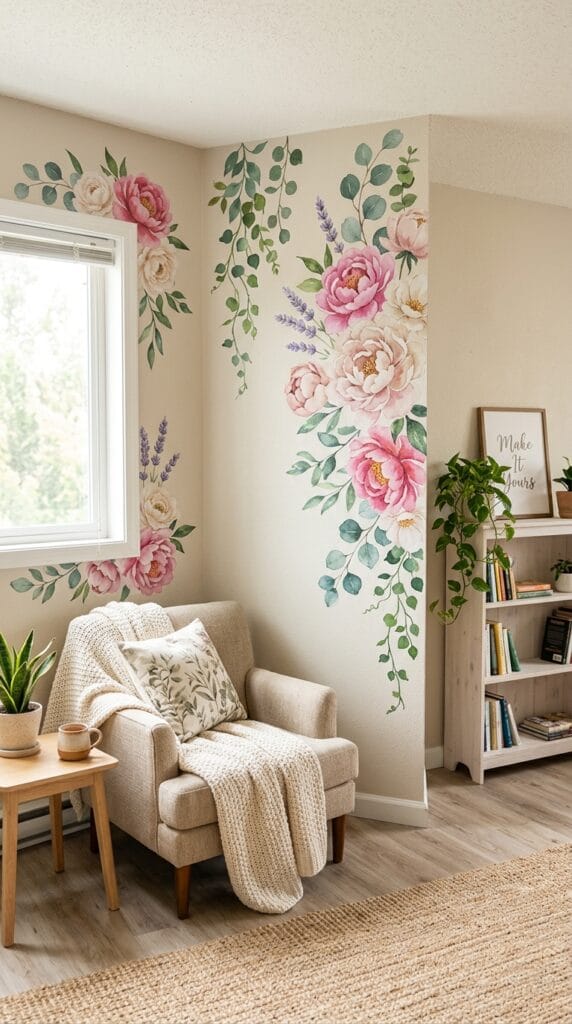
If permanent wallpaper makes you break into a cold sweat, peel-and-stick floral wall decals are your answer. These soft, watercolor-style prints come in gentle pinks, peaches, sage greens, and creams.
Why they work:
- Install in literally 1 hour (seriously, YouTube one and you’ll be fine)
- Remove completely without damage (crucial for renters)
- Expand small rooms visually through strategic placement
- Cost: $25-50 for a substantial wall
Installation tips:
- Apply to an accent wall rather than all four walls (prevents overwhelming)
- Cluster them above your bed or in a corner for intentional, not random, vibes
- Smooth out air bubbles with a credit card as you go
Pro move: pair decals with a thrifted frame cluster on an adjacent wall for layered visual interest.
Natural Fabric Dyeing (The Creative Route)
Want to feel like an artist while actually creating something useful? Natural fabric dyeing is easier than you think and costs under $10 total.
What you need:
- White cotton sheets or thrifted plain fabric (literally $2-5)
- Natural dye sources: coffee (browns), turmeric (yellows), beets (pinks), spinach (greens)
- Large pot, water, and your stove
- Rubber bands or string
The process (simplified):
- Boil your dye source for 30 minutes
- Strain out plant matter
- Soak your wet fabric in the dye bath for 2-4 hours
- Rinse and dry
- The result? A one-of-a-kind, watercolor-effect fabric with zero chemical residue
Tie-dye sections for a modern twist, or create ombre effects by gradually soaking different areas. You’ll end up with custom quilts or throw pillows that literally no one else owns.
Layered Pattern Mixing (The Styling Secret)
Ever walk into a vintage room and think “how is checks + florals + stripes not chaos?” Cohesion lives in the color family, not pattern variety.
Pick one color (say, rose pink) and commit to it across all your patterns:
- Floral quilt in rose, cream, and sage
- Gingham pillows in rose and white
- Lace throws in cream
- Botanical prints in rose-tinted frames
Your brain recognizes the color thread running through everything, so the patterns dance together rather than fight. This is honestly the cheat code for “I meant to do this” vintage styling.
YouTube creators emphasize this constantly: Stick to 3 colors, vary the patterns, watch the magic happen.
Real Bedroom Transformations: What’s Actually Possible
Case Study #1: Joanna’s Girls’ Bedroom (The Bunk Conversion)
Joanna faced a common problem—two daughters sharing a cramped bedroom with sad bunk beds and no personality. Here’s what she actually did:
Starting point: Cluttered bunk setup, cramped space, zero character
The budget-friendly approach:
- Found two matching bed frames on Facebook Marketplace (free + delivery)
- Purchased peel-and-stick floral wall decals from Amazon ($45)
- Scored a vintage nightstand from bulk trash day (free)
- Added an IKEA lamp ($20) to anchor the space
- Thrifted a cream throw blanket ($8)
Total investment: $73
Results: The daughters went from “ugh, we hate sharing” to actually wanting to spend time in their room. They reported sleeping better, the space felt organized without feeling sterile, and honestly? The room photographs beautifully (Mom’s happy too).
The transformation worked because Joanna didn’t try to match everything—she let the rose, cream, and sage color family do the heavy lifting while varying textures and patterns.
Case Study #2: The Dreamy Vintage Cottage Flow (YouTube Sensation)
This bedroom transformation went viral because it demonstrated real accessibility. The creator combined:
- Thrifted floral slipcovers on a plain couch (doubled as guest seating)
- Gingham check cushions in matching rose tones
- Lace doilies on nightstands (purely decorative, purely charming)
- DIY botanical walls with free prints in thrifted frames
- Recycled throws layered over thrifted quilts
The creator specifically noted the “grandmother’s hug” vibe—comfort meets aesthetics meets zero pretension. The video garnered 100k+ views because people saw themselves in it. This wasn’t expensive; it was thoughtful.
Case Study #3: 2026 Rustic Floral Guide (Step-by-Step YouTube Tutorial)
This channel walked viewers through transforming a completely blank room into a grandmillennial retreat using:
- Free botanical prints (sourced from Creative Commons, framed in $3 thrifted frames)
- $30 recycled floral throws layered intentionally
- Thrifted bed frame painted in soft sage
- DIY dyeing project for custom pillowcases
- Peel-and-stick decals for accent walls
Total budget: under $150. The final room looked like it cost $1,500+. The magic wasn’t magic—it was strategy.
Practical Budget Breakdown: What You Actually Need to Spend
The Bare Minimum Setup ($75-150)
If you’re working with basically nothing:
- Thrifted bed frame or mattress base: Free-$40
- Floral wall decals: $30-50
- Throw blanket (recycled or thrifted): $8-25
- One thrifted nightstand: Free-$20
- Simple lamp: $15-25
This creates a functional, beautiful bedroom foundation.
The Comfortable Middle Ground ($150-300)
You want more layers and personality:
- Quality thrifted quilt: $25-50
- Floral wall decals + botanical print wall: $50-75
- 2-3 throw pillows (thrifted or DIY): $20-40
- Nightstands (pair of thrifted pieces): $30-60
- Lighting (1-2 fixtures): $30-50
- Recycled textile throws: $30-50
- Frame collection for prints: $15-25
You’re looking at an intentional, layered, genuinely gorgeous bedroom.
The “Go Big” Setup ($300-500)
You’re comfortable investing in quality and want maximum impact:
- Vintage bed frame (wood or metal): $75-150
- High-quality thrifted or new floral bedding set: $100-150
- Wall treatment (decals + botanical wall): $75-100
- Furniture pieces (dresser, bench, additional nightstand): $75-150
- Lighting, throws, and accessories: $50-100
At this point, your room looks professionally designed—because it was, by you.
| Budget Level | Investment | What You Get |
|---|---|---|
| Bare Minimum | $75-150 | Functional foundation with character |
| Comfortable Middle | $150-300 | Layered, intentional, genuinely pretty |
| Go Big | $300-500 | Professionally designed aesthetic |
Common Mistakes People Make (And How to Avoid Them)
Mistake #1: Buying Damaged Furniture to “Fix Later”
The reality: Future-you won’t fix it. You’ll look at that wobbly chair for six months and then donate it.
The fix: Only buy pieces in condition you’d accept today. Surface-level wear? Character. Structural problems? Pass.
Mistake #2: Ignoring the Color Family
You end up with a room that feels chaotic rather than curated. Random rose, random blue, random green—your brain can’t find the thread connecting everything.
The fix: Pick three colors maximum and commit. Let them repeat across your patterns and textures.
Mistake #3: Overthinking It
Sometimes people spend six months planning the perfect vintage bedroom instead of just… starting. They research endlessly, pin obsessively, but never actually buy or DIY anything.
The fix: Pick one element (wall decals, OR thrifted quilt, OR botanical wall), execute it, then build from there. Momentum matters.
Mistake #4: Treating Thrifted Pieces Like New
That vintage quilt might have mild stains or slight odors. That thrifted dresser might have water marks. Part of vintage charm is accepting this rather than trying to restore everything to factory condition.
The fix: Embrace the imperfection. It’s literally what makes vintage feel authentic rather than “I bought this to look vintage.”
DIY Projects That Actually Worth Your Time
Project #1: Spray-Painted Thrifted Frames (30 minutes)
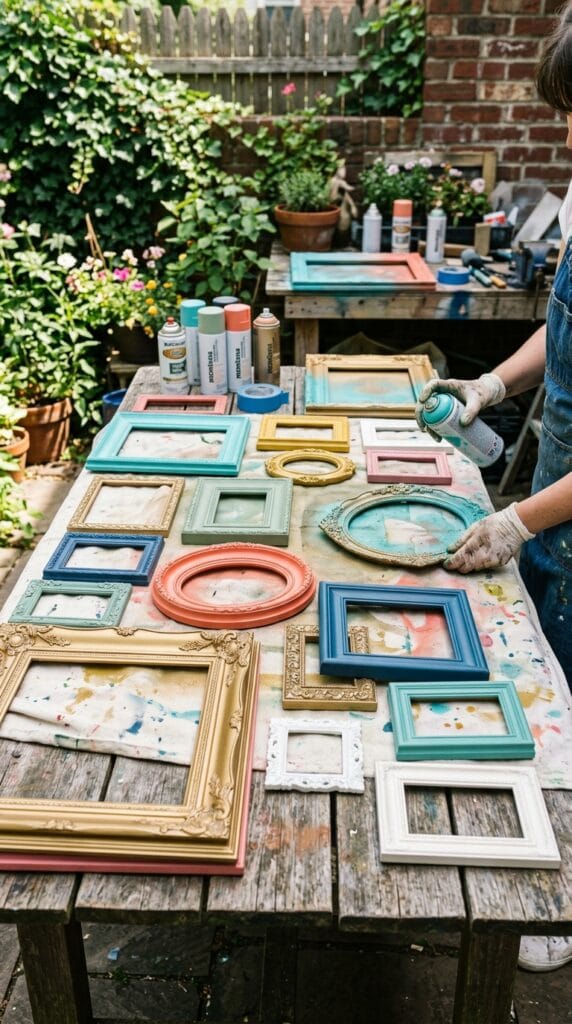
What you need:
- Thrifted wooden frames in various sizes
- Spray paint (soft white, cream, or sage)
- Drop cloth or newspaper
- Free botanical prints downloaded from the internet
The execution:
- Lay out frames on drop cloth outdoors
- Spray 2-3 light coats (let dry between coats)
- Print botanical illustrations on regular paper
- Frame them
- Hang in a cluster above your bed
Cost: Under $20 for frames + paint + time investment = gallery wall that looks expensive.
Project #2: Custom Dyed Pillowcases (2 hours)
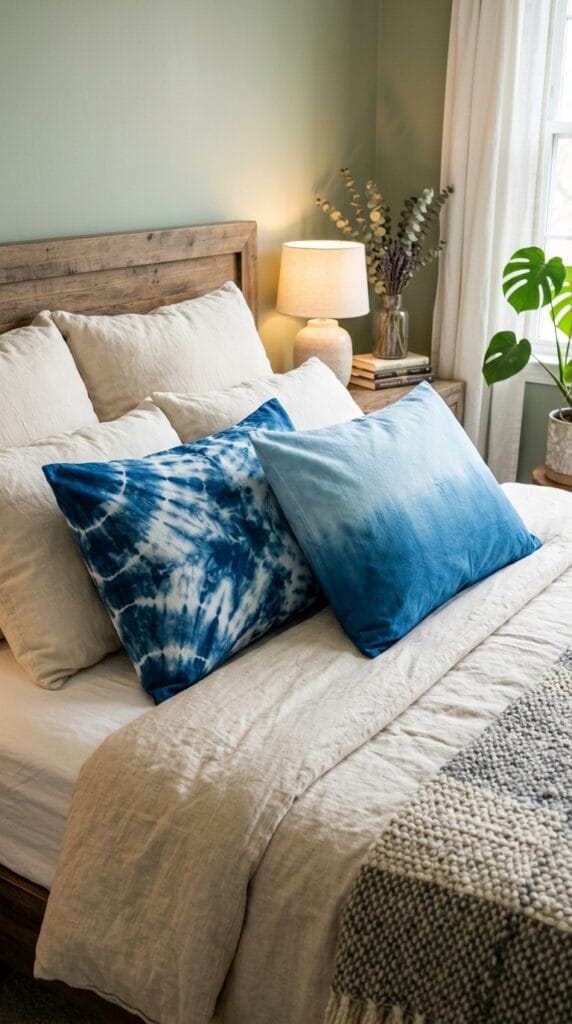
What you need:
- Plain cotton pillowcases (thrifted, $1-3 each)
- Natural dye (spinach, beets, turmeric, or coffee)
- Large pot, rubber bands, water
The execution:
- Tie sections of pillowcase with rubber bands
- Boil dye ingredients 30 minutes
- Soak tied pillowcases 2-4 hours
- Rinse, untie, dry
- The result: unique tie-dye in natural, soft colors
Cost: Under $15 for the entire project. You end up with custom pillows that literally no store sells.
Project #3: Layered Botanical Wall (1-2 hours)

What you need:
- Peel-and-stick floral wall decals
- Free botanical prints (printed on regular paper, framed in thrifted frames)
- Measuring tape, level
The execution:
- Plan your layout (sketch on paper first—yes, this matters)
- Apply wall decals in a gentle arc or cluster
- Position frames around them for layers
- Step back and feel accomplished
Cost: $30-50 if you already have thrifted frames. Completely renter-friendly.
Styling Tips from People Who Actually Know
The Power of Repetition
When you repeat the same color across different textures and patterns, your brain stops seeing “random stuff” and starts seeing “intentional design.”
A rose-colored pillow, a rose-patterned quilt, a rose watercolor print, and rose-tinted frames? They’re having a conversation. Your room feels planned.
Texture Variety (Without Chaos)
Soft quilts, rough woven throws, silky pillows, lace overlays—your room needs tactile variation to feel lived-in rather than sterile.
But keep them in your color family. That woven throw should be cream or sage, not bright orange.
The “Collected Over Time” Vibe
The best vintage rooms look like someone lived in them for years and gradually acquired pieces they loved. You can fake this by:
- Not displaying everything at once
- Grouping items in odd numbers (3 prints on a wall, not 4)
- Mixing frame styles intentionally
- Leaving some wall space breathable (resist the urge to fill every inch)
Lighting Creates Atmosphere
Soft, warm lighting transforms a room from “daytime bedroom” to “cozy retreat.” Skip harsh overhead lights.
Hunt for:
- Thrifted brass or ceramic lamps ($10-20)
- Warm-toned LED bulbs (literally $3)
- String lights for ambient softness ($15)
Lighting honestly matters more than people think, and it’s completely budget-friendly.
The Reality Check: What Vintage Floral Actually Requires
It Demands Intentionality
You can’t just throw things together and hope they work. You can make it work on a budget, but you need strategy—color families, texture variation, thoughtful placement.
This isn’t “slap it on the walls” decorating. It’s curating.
It Works Better in Calm Spaces
Vintage floral thrives when the room feels peaceful. Piles of laundry, cluttered shelves, or stressed energy undercut the whole aesthetic.
You don’t need an immaculate room, but you need intentional organization.
It’s Not Boring (Despite What Minimalists Say)
Critics claim vintage floral is “trying too hard” or “basic.” IMO, those people have never slept in a truly beautiful vintage room—they feel different. Your nervous system genuinely relaxes differently.
The aesthetic isn’t about status or trendiness. It’s about creating a space that whispers “rest here” rather than “scroll more.”
Your Vintage Floral Bedroom Action Plan
Week 1: Scout and Source
- Visit thrift stores, estate sales, and sidewalk treasures
- Screenshot your color inspiration (pick 3 colors)
- Make a list of free botanical prints you’ll download
Week 2: Grab Your First Pieces
- Commit to one major purchase (bed frame, quilt, or wall decals)
- Grab 2-3 accessory pieces (frames, throws, pillows)
- Don’t overthink; just start
Week 3: DIY Your Upgrades
- Complete one DIY project (frames, wall decals, fabric dyeing)
- Arrange your layout
- Live with it for a few days before adding more
Week 4: Layer and Refine
- Add second waves of pieces
- Adjust based on how your room actually feels
- Celebrate the space you created for under $300
You honestly don’t need more time than this. Perfectionism is just procrastination in disguise.
Final Thoughts: Your Cozy Cottage Awaits
Here’s the thing about vintage floral bedroom decor in 2026—it’s not expensive because it’s not supposed to be. The whole aesthetic celebrates finding beauty in collected pieces, intentional layering, and slow curation rather than fast consumption.
You don’t need a designer, a massive budget, or even an eye for interior design. You need color commitment, texture variety, and willingness to try.
You can absolutely create a bedroom that feels like stepping into a grandmother’s cottage, a botanical sanctuary, and your personal retreat all at once. For under $300. Using thrifted finds, DIY projects, and strategy.
Your future self—the one who actually sleeps deeply in this beautiful room—will thank you for starting today rather than pinning endlessly 🙂
Go find that estate sale quilt. Grab those wall decals. Download those botanical prints. Your cozy retreat is waiting.