Your bathroom cabinet doesn’t look “messy.” It looks like it accepted a tiny-items avalanche and decided to live with the consequences. I’ve been there—digging for tweezers like I’m panning for gold, knocking over a bottle tower, and somehow finding a hair tie from 2019.
So let’s fix it. These bathroom cabinet organizers use the space you already have—doors, corners, dead air above your stuff, and that weird under-sink area with pipes that ruins everything. Recent real-world tests and reviews show these hacks can deliver up to 50% more usable cabinet space in small bathrooms. And yes, you can do a lot of it with no-drill options.
Here’s what we’ll tackle:
- Door-mounted bins + magnetic strips
- Tension rods for sprays and bottles
- Lazy Susans for round bottles
- Pull-out organizers + U-shaped trays for pipes
- Risers + stackable clear bins
- Wine racks + file holders for towels/tools
- Labels + dividers + daily-use boxes
Why maximizing cabinet space matters (aka: stop buying duplicates you already own)
When you can’t see what you have, you buy backups. Then you “organize” by shoving everything deeper into the cabinet like it’ll sort itself out. Spoiler: it won’t.
People who switch to smart bathroom storage ideas (especially vertical and door storage) routinely report:
- Up to 50% more functional space by using vertical airspace and doors
- 30–40% less visible clutter once items live in zones instead of piles
- Up to 70% less time spent searching when labels and dividers do their job
And honestly… who wants a morning scavenger hunt?
Quick wins cheat sheet (scan this like you’re speed-reading recipes)
| Organizer Idea | Space/Time Win (Based on real-world results) | Best For |
|---|---|---|
| Door bins + magnetic strip | Adds “new” storage from unused door space | Tweezers, cotton swabs, nail tools |
| Tension rod | Frees cabinet floor instantly | Sprays, cleaners, hair products |
| Lazy Susan | Cuts rummaging and wasted corner space | Lotions, shampoos, vitamins |
| Pull-out + U-shaped tray | Uses full cabinet depth around pipes | Under-sink chaos, tall bottles |
| Risers + stackable bins | Captures wasted top space (often ~50%) | Towels, backups, skincare |
| Wine rack + file holders | Upright storage stops collapsing piles | Rolled towels, hot tools |
| Labels + dividers | Reduces search time dramatically | Daily essentials, small items |
1) Door-mounted bins + magnetic strips: the “hidden storage” flex
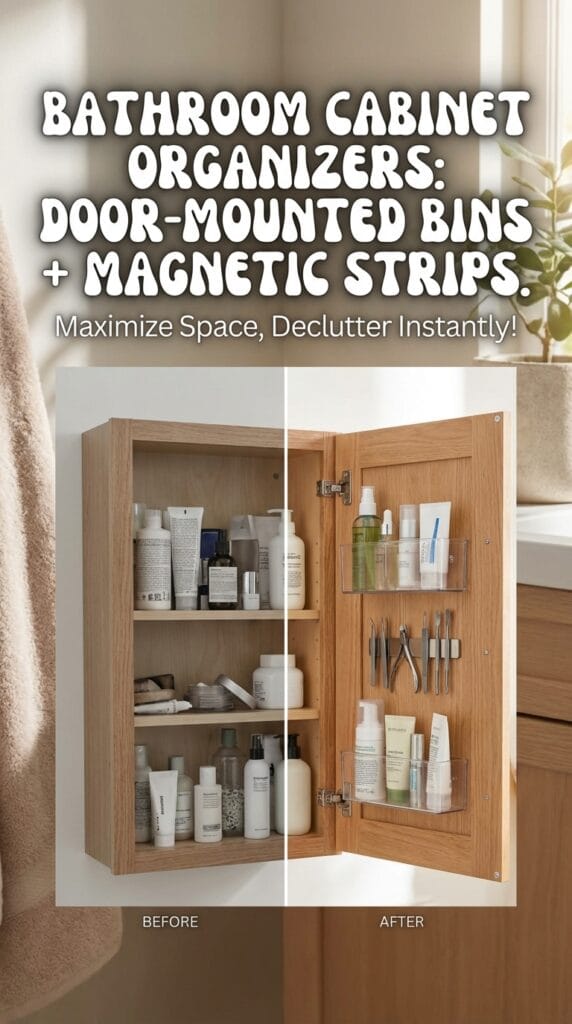
Cabinet doors count as real estate. Most people treat them like blank walls. Why?
What I use (and why it works)
You can stick clear mini bins or small hooks inside the cabinet door and instantly stop losing tiny items. I love clear bins because I can spot what I need in half a second instead of playing “guess which container holds nail clippers.”
Add a magnetic strip inside the door and you’ll keep metal tools visible and grabby:
- tweezers
- nail scissors
- bobby pins (the ones that vanish into other dimensions)
Setup tips (keep it renter-friendly)
- Choose adhesive-mounted bins if you rent.
- Keep weight light so the door doesn’t sag.
- Group items by task: “teeth,” “nails,” “first aid,” etc.
Ever opened a cabinet and thought, “Wow, I can actually find things”? Yeah, this gives you that.
2) Tension rods: hang sprays and reclaim the cabinet floor
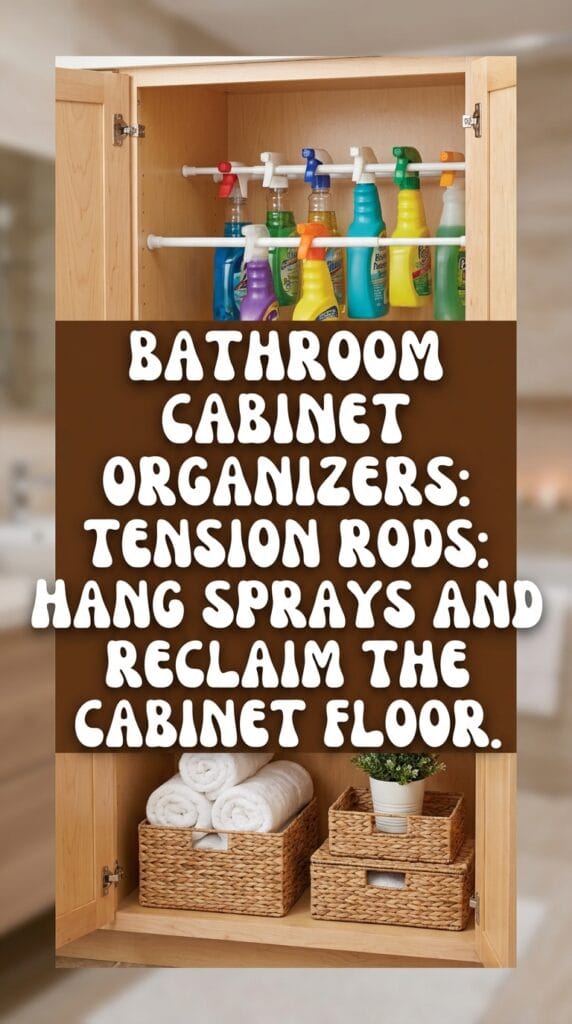
If you store sprays and bottles on the cabinet floor, you waste space fast. You also knock everything over constantly because bottles love drama.
How to use a tension rod under the sink
You twist a tension rod into place and hang spray bottles by the trigger. You immediately free floor space for bigger items like:
- toilet paper reserves
- tissue boxes
- refill soap bags
- bulk shampoo
No drilling. No brackets. No crying.
Best placements (pick your weapon)
- Front-to-back under the sink for daily sprays
- Side-to-side around plumbing for awkward layouts
FYI, this hack works even when pipes steal half your cabinet. Pipes always act like they pay rent, so you might as well work around them. 🙂
3) Lazy Susans: the easiest way to stop corner chaos
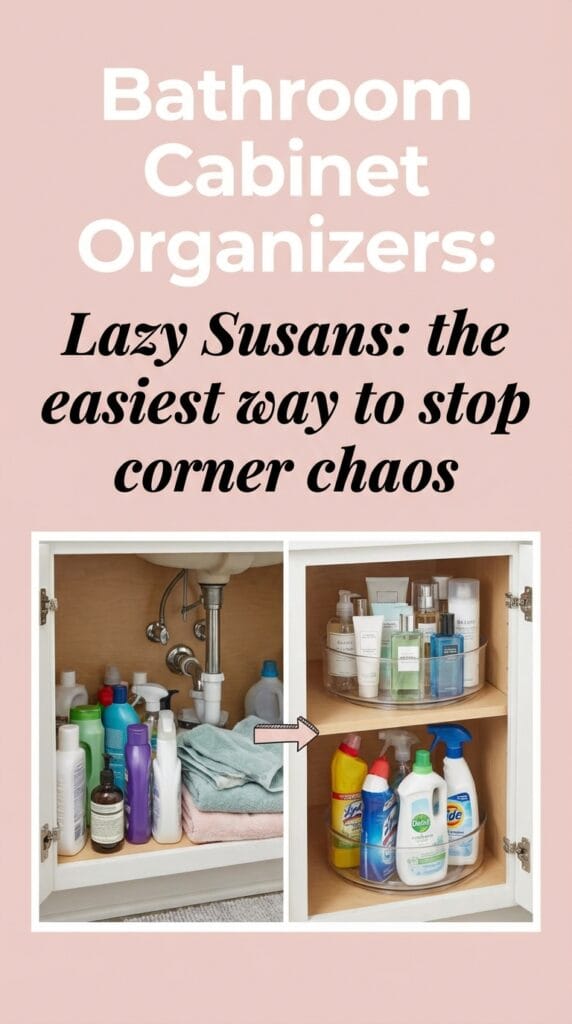
Deep corners turn into product graveyards. You put a lotion back there and never see it again until you move out.
Why a lazy Susan feels like magic
A lazy Susan turns “digging” into “spinning.” You get 360-degree access, so you stop stacking bottles in shaky layers.
Real-world organization tests often show 30–40% clutter reduction once people switch corners to turntables. That tracks with my experience because rotation fixes the “out of sight, out of mind” problem.
What belongs on a lazy Susan
- shampoo + conditioner
- lotions and face wash
- vitamins and travel sizes
- skincare you use weekly
Pro tip
Pick a model with a rim so bottles don’t fly off when you spin it like you mean it.
4) Pull-out organizers + U-shaped trays: win back depth (even with pipes)
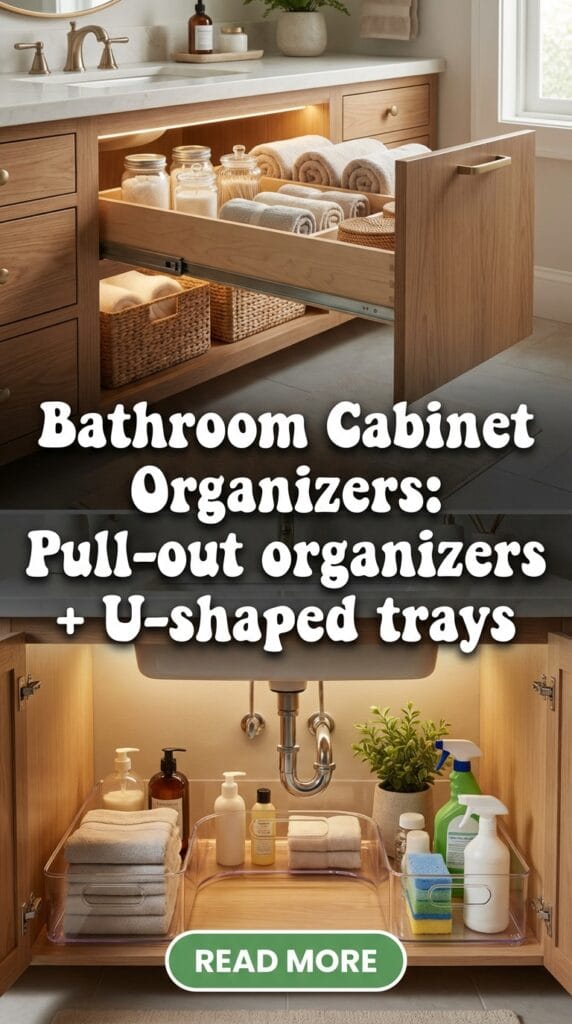
Under-sink cabinets look roomy until plumbing shows up and ruins the party.
Why pull-outs beat “bins on the floor”
Pull-outs let you use the entire cabinet depth without crawling inside. You slide the organizer out, grab what you need, and slide it back. Your back stays happy and your cabinet stays sane.
Recent customer review trends show 90%+ positive satisfaction for sturdy pull-out systems, and people keep praising:
- easy assembly
- smooth sliding
- solid build quality
The under-sink MVP: U-shaped pull-outs
A U-shaped tray wraps around pipes instead of fighting them. You use the “dead” space and store more where you actually need it.
What I store in pull-outs
- hair products in one bin
- cleaning supplies in another
- backup toothpaste/soap in a third
Ever wondered why under-sink areas always feel messy? You can’t see the back. Pull-outs fix that immediately.
5) Risers + stackable clear bins: use the air your cabinet wastes

Most cabinets waste a ridiculous amount of space above your stuff. You stack items only one level high, and you donate the top half of your cabinet to… nothing.
Why risers matter
Risers create a second “floor,” and stackable bins turn vertical space into usable storage. Research-backed organizing tests commonly estimate cabinets waste up to 50% of top space, and risers claw that space right back.
What works best (IMO)
- Clear acrylic bins for skincare and backups (you see inventory instantly)
- Stackable bins for towels and toilet paper
- Risers for short items (deodorant, minis, makeup bags)
Quick stack strategy
- Put daily items at eye level.
- Put backups up high.
- Keep heavy stuff low so you don’t drop a shampoo bottle on your foot like a cartoon.
6) Wine racks + file holders: weirdly perfect for towels and hot tools
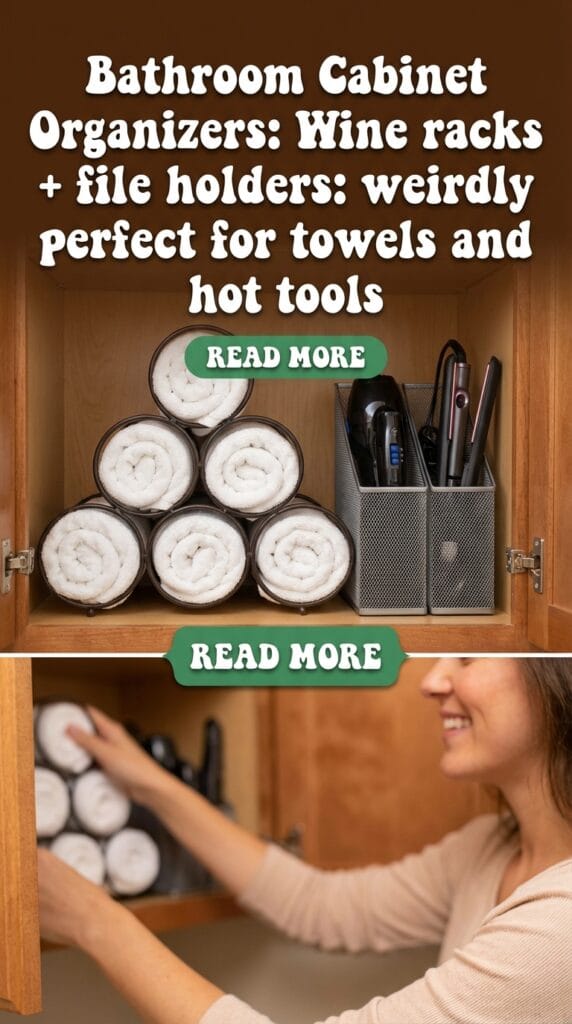
Yes, I just told you to put a wine rack in your bathroom. No, you don’t need to explain it to guests.
Wine racks = towel heaven
A small wine rack holds rolled towels upright. You get a spa vibe and you stop toppling towel stacks. Win-win.
File holders = hot tool organizers
A metal or plastic file holder stores:
- flat irons
- curling wands
- brushes
- cords (so they stop strangling everything else)
When this hack shines
- tiny bathrooms with zero drawer space
- shared bathrooms where tools multiply overnight
- cabinets that feel “full” but still look chaotic
You can also add a basket for extra rolls of toilet paper. Because nothing says “adulting” like stocking TP where you can actually reach it.
7) Labels + dividers + daily-use boxes: the system that stays organized
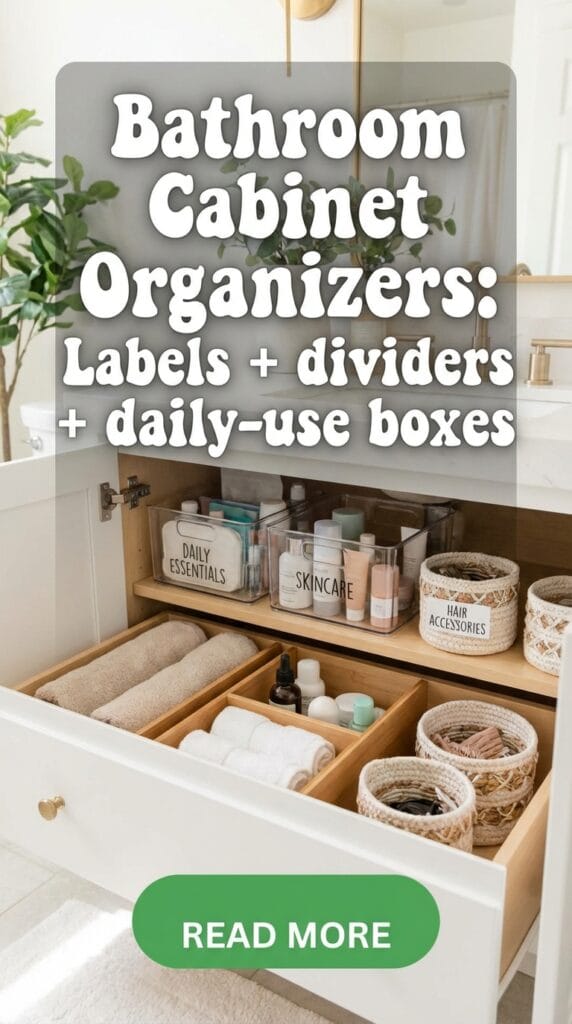
You can buy every organizer on Earth and still lose the battle if you skip categories. Labels and dividers keep your setup stable after the first week of good intentions.
My favorite “stays tidy” combo
- Drawer dividers for tiny items (hair ties, clips, cotton rounds)
- A daily-use box for your go-to routine (AM skincare, deodorant, meds)
- Labels so everyone puts things back correctly
People who label and zone items report up to 70% less time spent searching, and that matches real life. When you name a bin “TEETH STUFF,” nobody debates where floss goes.
Keep it simple
- Label by function, not brand.
- Use short labels you can read fast.
- Re-label when routines change (because they always do).
And yes, this step sounds boring. It also stops your cabinet from re-chaos-ing itself in three days :/
A simple step-by-step plan (so you don’t reorganize for 6 hours and quit)
You don’t need a full weekend. You need a plan and a trash bag.
Step 1: Empty and purge (15–25 minutes)
- Toss expired products.
- Donate unopened extras if you won’t use them.
- Combine duplicates where it makes sense.
Step 2: Measure like a grown-up (10 minutes)
Measure:
- cabinet width
- cabinet depth
- cabinet height
- door interior clearance
- pipe location (under sink)
Step 3: Pick your “starter three”
If you want the fastest results, start with:
- Door bins (tiny items stop roaming)
- Tension rod (floor space returns instantly)
- Riser or stackable bins (you reclaim vertical space)
Step 4: Zone your cabinet like a mini store
Use zones such as:
- Daily routine
- Hair
- Dental
- First aid
- Cleaning
- Backups
Budget + “what to buy” table (because guessing wastes money)
| Organizer | Typical Cost Range | Tools Needed | Best For |
|---|---|---|---|
| Adhesive door bins | $10–$25 | None | Small items |
| Magnetic strip | $8–$20 | Adhesive | Metal tools |
| Tension rod | $8–$18 | None | Hanging sprays |
| Lazy Susan | $12–$30 | None | Bottles in corners |
| Pull-out organizer | $30–$120 | Screwdriver | Under-sink depth |
| U-shaped tray | $25–$80 | Screwdriver | Around pipes |
| Risers/stackable bins | $10–$40 | None | Vertical storage |
| File holder/wine rack | $8–$30 | None | Towels/tools |
If you search for best organizers for small bathroom cabinets, these categories usually dominate for a reason: they work without custom renovations.
Common mistakes (so you avoid the “organized once” trap)
- You buy organizers before you purge.
- You store daily items in the back.
- You overload bins until they warp or fall.
- You skip labels and blame the cabinet later.
Keep your cabinet at about 80% full so you can actually move things. You want function, not a storage Jenga championship.
FAQs: quick answers for real-life bathrooms
How do I organize small bathroom cabinets fast?
Start with door-mounted storage, a tension rod, and stackable bins. Those three upgrades can deliver the biggest space gains with the least effort.
What works best for under-sink cabinets with pipes?
Use U-shaped pull-out trays and a tension rod. You’ll store items around plumbing instead of fighting it.
Which bathroom cabinet organizers work for renters?
Choose adhesive bins, tension rods, and freestanding risers. You’ll avoid drilling and still get a major upgrade.
How do I keep my cabinet organized long-term?
Do a 5-minute weekly reset and a quarterly purge. Labels help everyone put things back where they belong.
Wrap-up: pick one idea and start today
If your cabinet stresses you out, you don’t need a remodel—you need smarter storage. Use door-mounted bins, tension rods, lazy Susans, pull-outs, and stackable risers to maximize cabinet space and finally make everything easy to find.
Try just one upgrade today. You’ll feel the difference the next time you reach for something and don’t start a chain reaction of falling bottles. And honestly, that counts as peace.